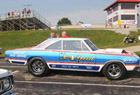
Used to be Blue's Valiant
Moderator: Moderators


Steve, Yes I did. I had a mate roll the bead as I don't have a bead roller these days. Done plenty of it in the past though, always makes you sweat a bit, especially if it's taken you a long time to make a panel 'cos if you cock up the bead the panel is scrap. It adds quite a bit of rigidity to a panel, it's not just for decoration.
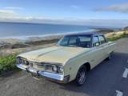
Anyways, I'm a happy camper today, my registration document finally arrived today after a month of playing postal ping pong with the DVLA....
Anyways, I'm a happy camper today, my registration document finally arrived today after a month of playing postal ping pong with the DVLA....
-
autofetish
- Posts: 5599
- Joined: Sat May 21, 11 6:43 am
It's an MSD firewall feed thru for the coil lead,
http://www.msdignition.com/Products/Coi ... ,_Red.aspx
You can get something similar for the starter cable as well, which I'll probably use.
http://www.msdignition.com/Products/Coi ... ,_Red.aspx
You can get something similar for the starter cable as well, which I'll probably use.
-
autofetish
- Posts: 5599
- Joined: Sat May 21, 11 6:43 am
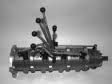
Long day Yesterday. Took the Valiant in to work at 6am for some chassis work, individual wheel lifts are great for this sort of thing, unrivalled access. Chassis ties in first, 2"x 2" box section. I tried something different this time, I cut a slot out of the bottom of the rear chassis section right back to where the spring mount is. The box section sits flush with the rear floor and hangs below the rear rail by about 3/4", making welding very easy. I had to grind down one of the ribs in the rear floor for a good fit and I can also weld the floor to the box section from inside the car.
- Attachments
-
- IMG_0708.jpg (174.02 KiB) Viewed 2446 times
-
- IMG_0707.JPG (80.08 KiB) Viewed 2446 times
-
- IMG_0705.JPG (93.28 KiB) Viewed 2446 times
Last edited by Blue on Fri Dec 20, 13 4:59 pm, edited 1 time in total.
Dropped the axle out next complete with the wheels, springs, shocks the whole shooting match. Notched the frame for the spring relocation boxes leaving the outer side of the frame intact. I mounted the boxes a little lower than usual so they sat level with and butted up to the chassis ties. I shaped the boxes to match the original frame profile for a more stealthy look in these BIVA ridden times. By the time I've ground some of the welding flat and covered it in stone chip, it shouldn't look obviously modified to the untrained eye. Really happy with the way it turned out, so I slung it all back together and drove home at 4pm totally knackered...
I'm not ready to inboard the springs yet, but the prep work is done. More cutting this week....
I'm not ready to inboard the springs yet, but the prep work is done. More cutting this week....
- Attachments
-
- IMG_0717.JPG (86.36 KiB) Viewed 2436 times
-
- IMG_0714.JPG (89.04 KiB) Viewed 2436 times
-
- IMG_0713.JPG (70.34 KiB) Viewed 2436 times
-
- IMG_0709.jpg (192.41 KiB) Viewed 2436 times