
if your cone unit is "Side gear and cone" as 1 complete part a rebuild is a No No ( integral cone slip resistant sure grip like the auburn units)
if it is a separated cone and side gear slip resistant diff it works better for street and track than a clutch diff, seemingly they work in the snow and on sand and everything..... and is indeed rebuildable ONCE
rebuild is eminently possible.
details here
http://www.geocities.ws/luckyducky_9670 ... 0Nov04.pdf
http://mpikas.blogspot.com/2008/03/rebu ... -cone.html
gist of it is
take out side gear
take out cone
remove enough from small end of cone so it doesn't bottom out. usual suggestion is just enough to remove the chamfer into the splined section so you don't compromise the coverage of axle spline by the cone, you can maybe go a few thou more
put cone in case and check it wedges before bottoming out (windows are supplied for peering in, and letting diff oil in/out...)
put in shim between cone and side gear of the same thickness as what you cut off from the face of the cone thereabouts
build spring pack spider gears and cross shaft into case
you are looking to shim it so that the cross shaft, just sits into its cut-out with the spider gears up against their domed washers, any further and it is loaded all the time and will work too well, and of course wear out again quickly.
do the same for the other side
american sites say this is a bodge... don't do it, never, never, Mr R ehrenberg says its wrong, scummy, rubbish etc
Aussie diffs came from the factory shimmed in just this way, and their diff factory was owned by borgwarner who came up with the design in the first place i Trust the aussies on this one
shim was used depending on variation of tolerance on the case and cones. most had none as the machining materials and tolerances on aussie diffs was great. have had a bout 5 apart and 1 was shimmed the rest were not. still with the paint/locktite splodges on the nuts from the day of assembly.
but only appropriate on seperate cone and side gear centres.
the other type needs the end of the cone cut and then the spider gears each need two concave washers....That's not very good, you have no adjustability, the spider gears all sit too far in and the thing is loaded to the hilt all the time. so i can understand people saying don't rebuild them.
i suppose with a lathe and 2 worn out integral cone/side gear units you could make separate side gear and cone set up if you were really bored and had no other option.
all a moot point if you have a plate diff to go in.....but handy to have a spare
Dave
Matt's 1970 'Trans-Am' Cuda
Moderator: Moderators
Re: Matt's 1970 'Trans-Am' Cuda
The Greater Knapweed near the Mugwort by the Buckthorn tree is dying
Re: Matt's 1970 'Trans-Am' Cuda
Indeed . Side gears and cones are separate on the 8 3/4.
Shim kits for cone-type SureGrip are available from the guru Doctor Diff. Will probably add one to my next surface-freight order
Shim kits for cone-type SureGrip are available from the guru Doctor Diff. Will probably add one to my next surface-freight order
- diff shim.jpg (58.94 KiB) Viewed 1768 times
Re: Matt's 1970 'Trans-Am' Cuda
A few relevant vintage pics :
Race Cuda shells on the Chassis jigs at AAR . Looks like panel beating has been started on rear quarters
Interior. Note tunnel mods ! No surprise that I had propshaft contact issues trying to replicate the ride height ! Maybe another job for the winter.
Fabbed brackets on floor will be for upper axle links to reduce axle tramp. I believe they accomplished this by installing shock absorbers horizontally in this position.
Looks like wheel tubs are in the process of being moved inwards.
And the obligatory 'for sale' ad requiring a time machine.
Race Cuda shells on the Chassis jigs at AAR . Looks like panel beating has been started on rear quarters
- aar shop.jpg (74.65 KiB) Viewed 1742 times
Interior. Note tunnel mods ! No surprise that I had propshaft contact issues trying to replicate the ride height ! Maybe another job for the winter.
Fabbed brackets on floor will be for upper axle links to reduce axle tramp. I believe they accomplished this by installing shock absorbers horizontally in this position.
Looks like wheel tubs are in the process of being moved inwards.
- tunnel mods.jpg (88.82 KiB) Viewed 1742 times
And the obligatory 'for sale' ad requiring a time machine.
- both_race_cars_4_sale_nov.jpg (95.5 KiB) Viewed 1742 times
Re: Matt's 1970 'Trans-Am' Cuda
So anyway, where was I ....
Clutch-type SureGrip disassembled for recon. I had to re-use the ring gear bolts from the donor diff as the bolts on my existing gearset have larger-dia shoulders to locate in the later size carrier holes and will not fit in the earlier carrier.
diff ready to install
New seals in the axle tubes
And new, additional breather on the right hand side of the axle. Good opportunity to drill a hole, and weld a steel -6 fitting to the axle whilst everything was apart
Clutch-type SureGrip disassembled for recon. I had to re-use the ring gear bolts from the donor diff as the bolts on my existing gearset have larger-dia shoulders to locate in the later size carrier holes and will not fit in the earlier carrier.
- IMG_4189.jpg (96.45 KiB) Viewed 1731 times
diff ready to install
- IMG_4191.jpg (81.18 KiB) Viewed 1731 times
New seals in the axle tubes
- IMG_4193.jpg (57.71 KiB) Viewed 1731 times
And new, additional breather on the right hand side of the axle. Good opportunity to drill a hole, and weld a steel -6 fitting to the axle whilst everything was apart
- IMG_4190.jpg (66.99 KiB) Viewed 1731 times
Re: Matt's 1970 'Trans-Am' Cuda
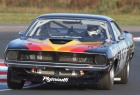
Thruxton Friday evening 20th September - parked up in a nice spot with Gary and Charles and their Mini . CSCC race weekend .
None of us had ever driven at the track before so a couple of laps by bicycle were in order.
Saturday, Bernie's V8s were racing with CSCC's 'Special Saloons and Modsports' .
830 am noise test
Yes I was going to be at the back again !
Qualifying was early, at 9am . Always a learning process at a new track. Thruxton looks uneventful on paper, but it's very fast, and the shape/exit of many of the corners are not particularly visible as you enter, due to the contours of the land. I made a few small errors on the first laps that I won't be repeating in a hurry... you could run out of tarmac really quickly here.
Race One I ended up holding myself up behind a V8 TR7 that was slightly slower than me , but which I couldn't quite pass - being very wary of going offline on the faster sections.
- IMG_4238.jpg (78.09 KiB) Viewed 1722 times
- IMG_4224.jpg (47.05 KiB) Viewed 1722 times
830 am noise test
- thruxton noise.jpg (72.96 KiB) Viewed 1722 times
Yes I was going to be at the back again !
- thruxton lineup.jpg (53.2 KiB) Viewed 1722 times
- Thruxton qualifying 2.jpg (49.66 KiB) Viewed 1722 times
- Thruxton qualifying.jpg (87.97 KiB) Viewed 1722 times
Race One I ended up holding myself up behind a V8 TR7 that was slightly slower than me , but which I couldn't quite pass - being very wary of going offline on the faster sections.
- thruxton race 1 TR7.jpg (54.71 KiB) Viewed 1722 times
- Attachments
-
- thruxton race 1.jpg (57.25 KiB) Viewed 1722 times
Last edited by Matt on Tue Oct 01, 19 11:32 pm, edited 1 time in total.
Re: Matt's 1970 'Trans-Am' Cuda
Brilliant!
I see you were behind "Marigold" then?
Cheng said you did really well.
I LOVE this car!!
I see you were behind "Marigold" then?
Cheng said you did really well.
I LOVE this car!!
Pete Wiseman; Cambridge.
Mopar by the grace of God
Mopar by the grace of God
Re: Matt's 1970 'Trans-Am' Cuda
Well that's very kind of Cheng !
Lap times from race 1 :
I didn't improve on my qualifying time at all , which was disappointing.
We sat on the balcony afterwards, watching the second round of the Swinging Sixties race, and there was a Mustang on comparable tyres to mine lapping at around 1:31 . I looked at it and thought about the physics and said to myself - there's absolutely no reason why I can't drive faster than I am.
So I went out into the race 2 determined to lap quicker - which produced good results ! Somehow I managed to shave 5 1/2 seconds off my previous best ..
here's two laps on You Tube (Cheng is in front of me - he's on old tyres which explains his relative slowness) . The second lap is the fast one. Still much room for improvement though. I was so happy with Allard corner (right-hander just after the pit straight/ finish line) that I got increasingly untidy through the chicane following it...
And not a drip from the rear axle all weekend.
Lap times from race 1 :
- thruxton race 1 times.jpg (42.38 KiB) Viewed 1714 times
We sat on the balcony afterwards, watching the second round of the Swinging Sixties race, and there was a Mustang on comparable tyres to mine lapping at around 1:31 . I looked at it and thought about the physics and said to myself - there's absolutely no reason why I can't drive faster than I am.
So I went out into the race 2 determined to lap quicker - which produced good results ! Somehow I managed to shave 5 1/2 seconds off my previous best ..
- Thruxton race 2.jpg (47.75 KiB) Viewed 1714 times
here's two laps on You Tube (Cheng is in front of me - he's on old tyres which explains his relative slowness) . The second lap is the fast one. Still much room for improvement though. I was so happy with Allard corner (right-hander just after the pit straight/ finish line) that I got increasingly untidy through the chicane following it...
And not a drip from the rear axle all weekend.
Last edited by Matt on Tue Oct 01, 19 11:47 pm, edited 4 times in total.
Re: Matt's 1970 'Trans-Am' Cuda
Donington next on 26th October. With the CSCC Swinging Sixties series.
A few things to do:
1) Hope it doesn't rain... I think the wet will be scary.
2) Fit a screen demister/heater anyway.
3) Take off the front spoiler to comply with series regs. Shame !
4) Fit working headlights, again for regs.
5) Uncork the exhaust and see if the car goes faster. Noise limits not too bad at Donington.
6) Straighten the bl00dy steering wheel. It's *really * annoying me now.

Re: Matt's 1970 'Trans-Am' Cuda
Gavin Chisholm - 414ci W2 Stroker SmallBlock Panther Pink '71 Challenger convertible - in bits
Car progress can be viewed here
Car progress can be viewed here
Re: Matt's 1970 'Trans-Am' Cuda
Brilliant, well done Matt, getting quicker each time out.

Re: Matt's 1970 'Trans-Am' Cuda
Superb, excellent, fantabydozy, loving this thread. 
Are we there yet dad ..... 10 to the gallon but worth it.
MMA Public Relations Officer.
MMA South London and Surrey Area Rep.
MMA Public Relations Officer.
MMA South London and Surrey Area Rep.
-
ScottyDave
- Posts: 1674
- Joined: Sun Mar 08, 15 9:38 pm
- Location: Dave Evans: MMA 130, Worcestershire
Re: Matt's 1970 'Trans-Am' Cuda
Great video, loved it and it did appear quicker on the second lap 
73 Charger 318
MMA-130
MMA-130

Re: Matt's 1970 'Trans-Am' Cuda
5 seconds improvement by watching a Mustang do it is great!!
Shame about the spoiler coming off. Mine is off too, and I'm growing to like the look of it.
Shame about the spoiler coming off. Mine is off too, and I'm growing to like the look of it.
Matt Hollingsworth - Vehicle Registrar
Panther Pink 73 Aussie Charger 265 Hemi 4 spd
Challenger Sam Posey Tribute car
Panther Pink 73 Aussie Charger 265 Hemi 4 spd
Challenger Sam Posey Tribute car
Re: Matt's 1970 'Trans-Am' Cuda
Been doing a couple of small jobs
I'm at Donington next weekend with the CSCC, and the regs require working headlights.
Fortunately these units drop pretty much straight in, and I'd already installed the necessary wires in the car's loom.
Still got to trim round them. I was going to install more polycarbonate rings cut from sheet, but I've just seen these which might do nicely.
I've been pretty lucky with the weather so far, but it's going to be wet or cold at some point and the car currently has no demister. I could go standard hot-water style, with hoses running to a small heater in the interior, but though i'd try something a bit simpler and more compact.
Many new cars have an ceramic electric element used for the screen demister when the engine's cold.
Need to get one from a car about 10 years old as the newer ones are too high-tech with built-in digital control circuitry.
Add a fan from Car Builder Solutions, and some sheet ally.
And it works ! (With apologies for hasty sheet metalwork...)
There's plenty of airflow, and it gets quite warm. The unit is pulling about 40 amps, which the charging system *should* support, and there's already a handy terminal stud on the car's main battery cable near where the heater will go.
I'm at Donington next weekend with the CSCC, and the regs require working headlights.
Fortunately these units drop pretty much straight in, and I'd already installed the necessary wires in the car's loom.
- bowl.png (143.48 KiB) Viewed 1606 times
- IMG_0041.jpg (129.36 KiB) Viewed 1606 times
- bowl ring.png (164.01 KiB) Viewed 1606 times
I've been pretty lucky with the weather so far, but it's going to be wet or cold at some point and the car currently has no demister. I could go standard hot-water style, with hoses running to a small heater in the interior, but though i'd try something a bit simpler and more compact.
Many new cars have an ceramic electric element used for the screen demister when the engine's cold.
Need to get one from a car about 10 years old as the newer ones are too high-tech with built-in digital control circuitry.
- element.jpg (42.21 KiB) Viewed 1606 times
- IMG_0042.jpg (85.28 KiB) Viewed 1606 times
- IMG_0043.jpg (90.01 KiB) Viewed 1606 times
And it works ! (With apologies for hasty sheet metalwork...)
There's plenty of airflow, and it gets quite warm. The unit is pulling about 40 amps, which the charging system *should* support, and there's already a handy terminal stud on the car's main battery cable near where the heater will go.
- IMG_0047.jpg (93.67 KiB) Viewed 1606 times
Re: Matt's 1970 'Trans-Am' Cuda
That's 2/3 of a horsepower...switch off when overtaking 
Gavin Chisholm - 414ci W2 Stroker SmallBlock Panther Pink '71 Challenger convertible - in bits
Car progress can be viewed here
Car progress can be viewed here