Page 1 of 1
What goes in those holes
Posted: Mon Mar 12, 12 9:47 am
by autofetish
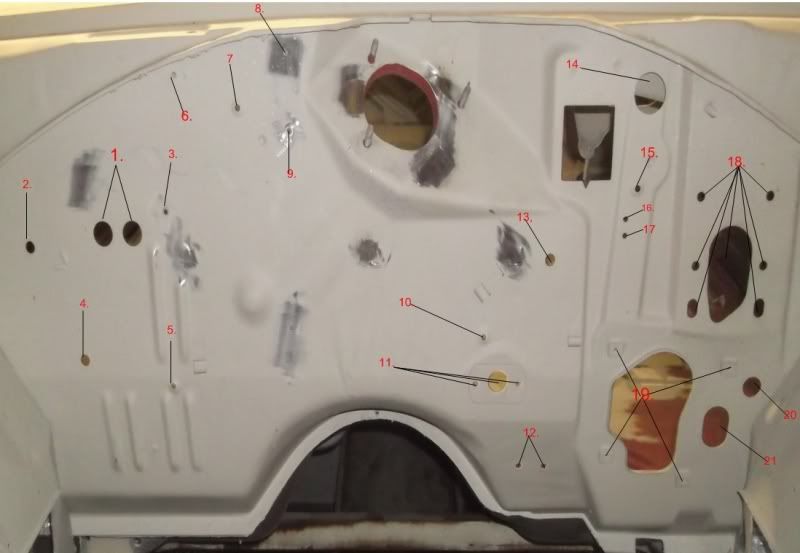
I am looking at having some of the holes in the bulk head welded up before painting
1. is heating hoses
18. is brakes
19. is left and right


<a href="
http://photobucket.com" target="_blank"><img src="
http://i73.photobucket.com/albums/i205/ ... awing1.jpg" border="0" alt="Photobucket"></a>
Posted: Mon Mar 12, 12 10:04 am
by ANTON
2,4 and 13 are heater box
14 is vacuum pipes for headlights
16 and 17 are starter relay
11 and 12 is accelerator arm.
20 is speedo cable
6 is ballast resistor
8 and 9 is for voltage regulators
5,7,10 and 15 are firewall insulation nails
21 is rubber grommet but is needed if you have a manual car for the clutch.
19 is the steering column base plate bolt from inside the car.
3 is for the coil bracket on a small block car.
Posted: Mon Mar 12, 12 10:19 am
by autofetish
Anoton your on fire today

I would like and engine bay with a custom no mess look
eg
Wiring loom hidden moden electrics electric vac doors.
Apart from welding up the holes i dont need is there anything else i could do.
Whats ever-ones view on me welding up all the holes i don't need eg.
Weld up number ???
14
16
17
6
8
9
5
7
10
15
3
Posted: Mon Mar 12, 12 10:40 am
by ANTON
For 5,7,10 and 15 you could weld the holes up and then weld nuts on the inside of the fire wall to bolt the insulation in place.
16 and 17 will be hard to relocate as the fuse able link that comes out of the bulkhead connector is only very short.
6 can be welded up and hide the basllast resistor under the dash inside the car.
8 and 9 can be welded up and hide voltage regulator in the car.
Orange box can be in the car under the dash.
3 can be welded up as you have big block and the coil is mounted to the engine.
14 you can weld up st you say you will use electric actuators for the headlight doors.
If you weld up the bulk head connector hole you can run the wiring through the fire wall and into the underside of the wing and then 16 and 17 can as be welded up and starter relay and be under wing.
you have a lot to decide on and do before it goes to paint.
Posted: Mon Mar 12, 12 10:56 am
by autofetish
ANTON wrote:For 5,7,10 and 15 you could weld the holes up and then weld nuts on the inside of the fire wall to bolt the insulation in place.
16 and 17 will be hard to relocate as the fuse able link that comes out of the bulkhead connector is only very short.
6 can be welded up and hide the basllast resistor under the dash inside the car.
8 and 9 can be welded up and hide voltage regulator in the car.
Orange box can be in the car under the dash.
3 can be welded up as you have big block and the coil is mounted to the engine.
14 you can weld up st you say you will use electric actuators for the headlight doors.
If you weld up the bulk head connector hole you can run the wiring through the fire wall and into the underside of the wing and then 16 and 17 can as be welded up and starter relay and be under wing.
you have a lot to decide on and do before it goes to paint.
Boat leaves friday at 22:00
Posted: Mon Mar 12, 12 12:30 pm
by Dart Vader
The really big hole is where the engine and gearbox goes, dont weld that up

Posted: Mon Mar 12, 12 12:37 pm
by steveo
Posted: Mon Mar 12, 12 1:12 pm
by db

This'll be great info for me too- i'm not welding holes but i was wondering what they were all for!
Posted: Mon Mar 12, 12 11:51 pm
by Rich
weld the lot n re-drill what you need...... simples..
apart from the big one that is..

Posted: Mon Mar 12, 12 11:58 pm
by Adrian Worman
Leave em all and stitch fresh sheet metal over the top to leave the surface free of any stamping shapes and just bolt the lot to the existing holes on the inside of the firewall.................... It'll look well smooth and custom
Posted: Tue Mar 13, 12 6:37 am
by autofetish
Adrian Worman wrote:Leave em all and stitch fresh sheet metal over the top to leave the surface free of any stamping shapes and just bolt the lot to the existing holes on the inside of the firewall.................... It'll look well smooth and custom
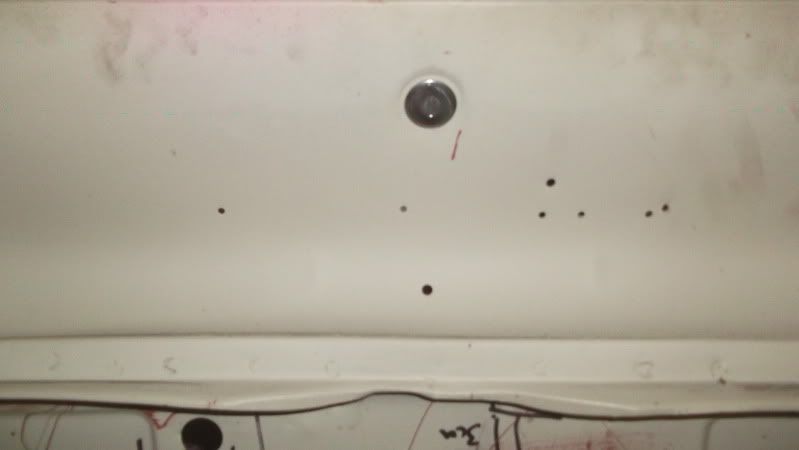
This would be the best but its soo not flat think welding is the best option then can leave wipper motor hole ect
So Found some more holes what are there's charger badge some don't look so orginal

??????????????????
<a href="
http://photobucket.com" target="_blank"><img src="
http://i73.photobucket.com/albums/i205/ ... CF0165.jpg" border="0" alt="Photobucket"></a>
Posted: Wed Mar 14, 12 9:14 am
by ANTON
autofetish wrote:Adrian Worman wrote:Leave em all and stitch fresh sheet metal over the top to leave the surface free of any stamping shapes and just bolt the lot to the existing holes on the inside of the firewall.................... It'll look well smooth and custom
This would be the best but its soo not flat think welding is the best option then can leave wipper motor hole ect
So Found some more holes what are there's charger badge some don't look so orginal
??????????????????
<a href="
http://photobucket.com" target="_blank"><img src="
http://i73.photobucket.com/albums/i205/ ... CF0165.jpg" border="0" alt="Photobucket"></a>
Weld them all up for now and I will make you a template of where the badges go as I have mine off at the moment.
Posted: Wed Mar 14, 12 1:09 pm
by autofetish
Thanks
Posted: Fri Mar 16, 12 10:58 am
by ANTON
Here is the template for the holes I promised you for the rear tail light panel.