Page 1 of 2

Stumped at tripping out......

Posted: Tue Jun 10, 14 9:49 pm
by Dave81
Right, i'm at a loss.

Firstly the good news.

The MAD conversion has worked and now has the car is sat at 14.88v when engine under load. Around 13v at idle. So very happy that the rewiring has solved the issue! :D :thumbright:

When i did the ammeter bypass, i added in a spade fuse connection between the starter Solenoid and the main bypass loop (instead of the fusible link)!
Image
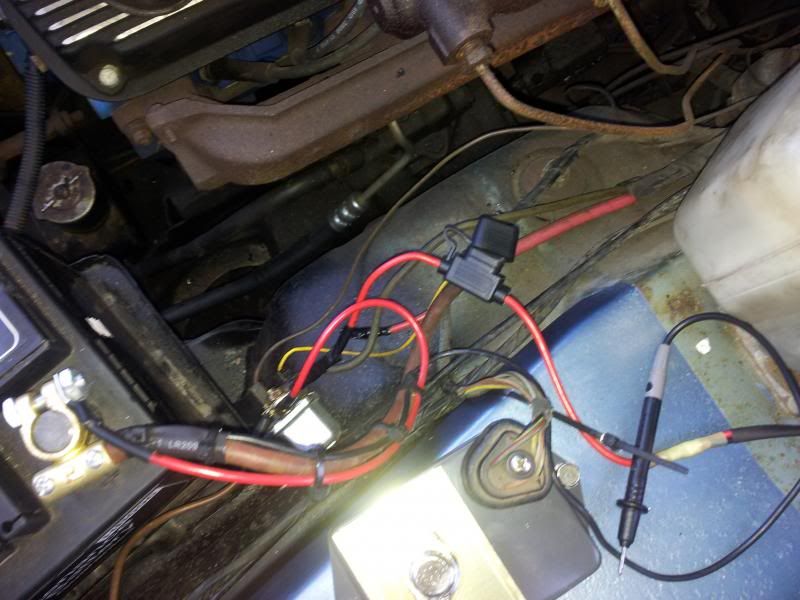
Will come back to this..........

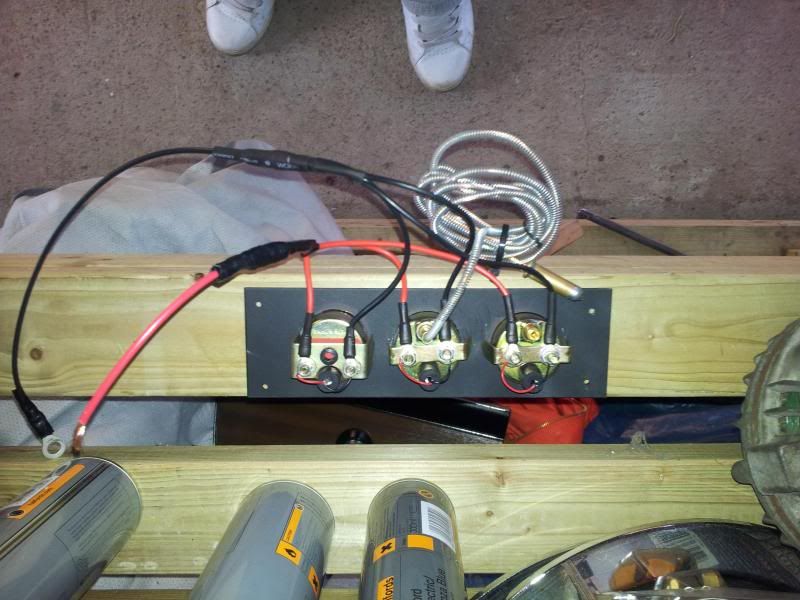
The new gauges have been wired up......And i've had a go at fabricating a gauge holder to tidy some other stuff up.....
Three 17amp wires as individual feeds to each gauge with a 30amp common wire that joins them. This is the same for the 12v feed as it is the earth wires.
Voila.....
Image

After looking around the dash i found the radio feed, red with white tracer, white and 2x orange all into a connector block.......more importantly its next to the gauges mounting location!

I cut the red with white tracer out of the block as it is a switched feed (plus i'll not put a radio in until a complete rewire).
Following the wiring diagram also shows it off of the internal fuse block which i believe is a 20amp fuse?

So i connect the gauges to the radio feed and earth it via the steering column.

Turn key to position two and it blows the spade fuse above??????

Did the 25amp fuse i had and has also taken out three 30amp fuses in trials. The wiring is as per the MAD wiring diagram and i specifically bought 27.5amp wiring, so not happy to put anything but a 25amp fuse in for normal use as i do not want a repeat of Sat night (don't ask!!).

At a complete loss, can anyone see what or where the issue is?

What i cant understand is that the original fuse for the radio is a 20amp glass one in the fuse block under the dash.............How is that still in one piece whilst its blowing the 30amp fuse in the initial rewiring.

So i discconect the gauges from the 12v feed wire, put a new fuse in and the car is fine, starts and runs as it should............................. :scratch:

The dash is still out until i can solve the issue and so far i must have spent 10 hours on this Bananarama! little project..........so yet again the timescale for getting back onto the MOT issues slipping. NATS is getting tight for this year, and my patience is wearing thin........ :( :smash:

Errr............Ideas please?????????????? :idea1:

Posted: Tue Jun 10, 14 10:03 pm
by Mossy68
You sure your earth is good Dave ?

Posted: Tue Jun 10, 14 10:17 pm
by steveo
how i'm looking at it , could well be wrong , & its my eyes or monitor or both!! :shock: , the red live (A) for the bulbs is connected to the gauge mounting brace one side , while the other side is used for the negative ( ground wire ) (B) unless in not seeing every thing , the whole lot is metal , soon as you connect it up , it blows a fuse as its like touching + & - together

just connect the three red lives for the bulbs together with a bullit or butt connector , don't have the reds bolted to the gauge mounted stud bracket / brace thingy , because that's grounded with the black wires ! or it looks it , from where I am sitting

now if the gauge mounting studs & mounting brace are individually insulated , ignore what ive just said :shock: :cry: :thumbright:

Posted: Tue Jun 10, 14 10:36 pm
by Demon James
:iagree: With my electricians hat on thats how it also looks to me, have you got a side view Dave? cos at the moment it looks like an instant "POP" situation.

Posted: Tue Jun 10, 14 10:43 pm
by Mossy68
Well spotted Steve. Reckon your right there. Looks very small on my phone but the bracket does seen to be bridging the terminals ( unless insulated underneath nuts ?)
:thumbright:

Posted: Wed Jun 11, 14 6:22 am
by cadboy
Yes it looks like RED and BLACK cables are linked form the photos Dave.

Also if they are for the bulbs on the gauges then you may be able to use the orange cable on the radio, as that may be the one for instruments light, so light only comes on when the instrument light is on.

Worth a try.

Posted: Wed Jun 11, 14 7:29 am
by Demon James
If that's a volt meter (on left of picture) then the terminals will be insulted from the mounting bracket terminals so should be OK :thumbright: but I don't see why the other gauges need a 12v feed from the ignition? Temp in the middle? Oil pressure on the right?

Would this not turn all these gauges "on" as soon as the ignition comes on?

I only have the dash mounted temp gauge at 5v so haven't fitted this type but it only needs to have a feed to one side of the gauge which passes through it down the temp sender, through the temp sender (variable as heat changes the resistance) to ground when screwed into the engine block/manifold.

If the pressure gauge is mechanical then it will only need a feed from the lighting circuit to the small red wire, the black can stay as is.

This is much easier to just do than explain for me :lol: not used to posting advice I'm afraid, normally just pointless baloney :lol: :lol:

Posted: Wed Jun 11, 14 8:47 am
by Charger
as said, looks like it’s shorted across the mounting bracket to me

if those wires are only for gauge light, they don’t need to be that fat, the tails coming out of the bulb holders are sufficient, just run some longer length of similar thickness

i think you said gauges were sunpro?? not sure if the same but autometer gauges don’t use the mounting studs as terminals, terminals are separate, for the voltmeter, i would have thought there would be an extra terminal, maybe behind the mounting bracket

autometer volt gauge has 12v +ve and earth terminals, ok to use the mounting bracket for earth points as well, but you need to separate those red wires

:thumbright:

Posted: Wed Jun 11, 14 8:50 am
by Charger
search the web for sunpro wiring diagrams, they should be out there

if not i can send you the ones i have for autometer, they’ve got to be similar

Posted: Wed Jun 11, 14 8:57 am
by MilesnMiles
Dave, I'm with the other guys. It looks like you are shorting out the red/black wires to each other via the guage clamps. Might just be the pic, but...

On my gauges I have swivelled the unit so no two wires can contact each other or the guage mount to prevent such shorts.

Pic of typical guage set up

http://how2diyonline.com/wp-content/upl ... wiring.jpg

Posted: Wed Jun 11, 14 9:42 am
by Dave999
yup

join all brackets together and earth it or just bolt the lot into a metal pod that is bolted to the metal dash


12 volts switched to the bulb

signal wire to the input for the guage

don't need anything else

keep 12 volts away from those connectors and brackets on the back


Dave

Posted: Wed Jun 11, 14 11:27 am
by Demon James
Just the two Dave? Is there only room for the first ten? ;) :lol: :lol: :lol:

Posted: Wed Jun 11, 14 12:53 pm
by Dave81
steveo wrote:how i'm looking at it , could well be wrong , & its my eyes or monitor or both!! :shock: , the red live (A) for the bulbs is connected to the gauge mounting brace one side , while the other side is used for the negative ( ground wire ) (B) unless in not seeing every thing , the whole lot is metal , soon as you connect it up , it blows a fuse as its like touching + & - together

just connect the three red lives for the bulbs together with a bullit or butt connector , don't have the reds bolted to the gauge mounted stud bracket / brace thingy , because that's grounded with the black wires ! or it looks it , from where I am sitting

now if the gauge mounting studs & mounting brace are individually insulated , ignore what ive just said :shock: :cry: :thumbright:
Steveo......... :notworthy:

That will deffo be the problem then.

Sorry no side views until later, but this is the issue I think....

All instructions are per this.....
http://www.carid.com/images/sunpro/cust ... ctions.pdf

The Voltmeter has rubber mounting boots between the gauge clamp and the terminals. Both Water temp and oil pressure do not. So by my working then at the very least both these are basically mated together through the clamp and blowing the fuse????

Also found the other instructions on line.......................What a muppet............ :help:

http://www.carid.com/images/sunpro/cust ... ctions.pdf

I've gone and read the electrical gauge installation section and done that........ :wack:

So please confirm.............?

I do not require power feeds to the middle and right gauge as they are mechanical. I only need power and earth from the voltmeter.

The two posts on these are purely for mounting................?

Help is much appreciated chaps............
:thumbright: :thumbright:

Posted: Wed Jun 11, 14 1:13 pm
by Dave999
Demon James wrote:Just the two Dave? Is there only room for the first ten? ;) :lol: :lol: :lol:
yeah yeah fixed it.... :D


dave if you are testing guages off the car they won't work if the case isn't grounded bck to battery -

they will work once you mount them in a metal grounded dash

Dave

Posted: Wed Jun 11, 14 1:43 pm
by Dave81
Dave999 wrote:
Demon James wrote:Just the two Dave? Is there only room for the first ten? ;) :lol: :lol: :lol:
yeah yeah fixed it.... :D


dave if you are testing guages off the car they won't work if the case isn't grounded bck to battery -

they will work once you mount them in a metal grounded dash

Dave
Mounting studs are connected to the gauge casing, so would the ground off of the negative post not work the same as using the mounting bracket to the dash to ground it (in which case its then grounded via two points)?

Reason I'm not testing all hooked in is as per my exploits on Sat night.

I almost lost the car........which could of lead to the house........... :shock: