ok research dicates that many US mopars had Zinc leaf spring interliners as well as plastic
plastic to stop the springs wearing a notch in the next spring and Zinc to allow the front end of the leaves to slip silently when the axle winds up towards the floor (rear of leaves would splay in that situation so no need for Zinc)
and that they cover the centre bolt area forwards on the spring stopping before the plastic bit
i'm buggerd if i'm paying 100 bux + import for some strips of zinc and some bendy leaf spring clamp type clamps that any good london taxi shop could supply
so i purchased a sheet of zinc for 18 quid and cut it up
however i have no idea how far forward the zinc goes?
anyone know
does it stop at the plastic bit
does it stop before the plastic bit
does it make it as far as any clamps?
ta
Dave
Zinc interliners
Moderator: Moderators
Zinc interliners
The Greater Knapweed near the Mugwort by the Buckthorn tree is dying
many thanks for the offer
wish i'd seen it before i chopped up the zinc last night and stuck it in the post
either way i used a photo on the net
measured it compared it to a known chunk of plastic from an old spring
basically
long interliner has its hole 1 lenght of the plastic interliner in from the end and runs to within about an inch of the clamp
the short ones have their hole 1/2 the plastic length from the end
that seemed to imply an imbalance when you bolt the springs together so ignored that and built them at 1 full length as well.
each zinc cut to be inch shorter than the poistion of the plastic i.e goes into the metal clamp for the longest one
apart from the shortest which was cut to end just after the end of the shortest leaf which has no plastic slider
interliners face forward.
god knows if it will work
but recon they are there for friction reduction and anti ware properties of of the softer Zinc.
They go in dry, as oil or grease turns into grinding paste when mixed with iron filings grit and rust...
a halfway house between none and Auotfetish's teflon strips?
i'm aiming for a silent but robustly mounted rear end
well see
Dave
The Greater Knapweed near the Mugwort by the Buckthorn tree is dying
OK
APD/Anton has completed work on my car
it went in with sagging rear springs and the guts of the front eye bushes hanging out, it was dragging its ass like a dog with worms.
aim
get the springs returned to As New
and
while its on the Lift put in some custom made chassis connectors, car has had splits round the rear screen throughout my ownership and the leaded joints at the top and bottom of the screen pillars are showing some cracks in the lead. obviously we have a bit of flex so some connectors made sense
luckily all aussie cars are blessed with the torque boxes front and rear that mopar reserved only for its cabriolets and Big HP applications in the US
so Anton had a good base to connect to it was just the bit in the middle, the passenger cabin that was showing the stresses of 40 years of flexing.
were the aims achived
Yes indeed
The car ride height was measured for consistencey corner to corner front to back.
the car was jacked up to achieve desiired ride height
a correction for spring settling (couple of months use) was added to the spec.
The springs were taken off
Anton made an assesment of the bushes,rears were fine, front were bad
Roger was enlisted to get some aussie front eye bushes in just to make sure we got the correct width and diameter
I bent the ear of Chris Mr WASP to get me a couple of packs of plastic interliners
£18 a pack of 6 in Black plastic is way cheaper than the $15 each item the australian suppliers want for their white version of the same thing.
Aussie springs have no Zinc interliners from the centre of the spring going forwards
so i got a bit of 0.8mm and cut it up
springs went out for retemper and reset
aim was so that we could see the wheel in the arch not have it looking like it was wearing spats.
previously the wheel needed to be posted in at a 45* angle when changing tyres...thats not supposed to be the case
and i have some bigger wheels to go on
spring packs rebuilt with the zinc and plastic, new centre bolt and clamps
and of course painted.
no creaking no clanking no thumping.
once that was done and the car was back on 4 wheels work on the chassis could comence
The aussie chargers have a both unique spring length and a unique length of floor pan, its basically a 60s A body floor with 8 -10 inches missing.
it has of course the usual rear passenger foot tray dip, its just closer to the front than you would normally see.
on many a US mopar, i.e the longer ones a chassis rail could be arronged miss it on this it won't
An off the shelf rail is expensive, twice the price of US ones and 1/2 a world away...
So Anton build some up and fully seam welded any section that needed to be cut out to get them round the floor and the RHD hand brake conduits fuel line etc. Remeber its a LHD floor pan with all the drivers side stuff tansfered to the RHS so you have fuel line and handbrake on the same side
the rails were welded in
they butt up to the cross members but also go over the torque box/chassis cross member for a strong join much like the hotchkiss set up does.
does it work
oh yes the combo of both changes is great
rear end feels solid and secure, it handles the bumps and changes of camber without the teeth jaring thumps of the previous set up
my shocks actually have a job to do now
i no longer feel like the steering wheel is just a device used to wag the tail end of the car about in a random manner.
all latteral movemnt of axle is gone or at least greatly reduced going by seat of pants feel
and the rear end follows the front immediately, if the reverse of scuttle shake (rear end shimmy?) exists its gone, there is less of the rear end slowly side stepping and wheel hopping over pumps and ripples as you blat round long slip road type corners
I like
Job done.
Anton kept me up to date on progress, any issues were discussed and he also sent a load of of photos
some pics
note the section out of the rail
i didn't want them welded into the floor, personal choice, car needs to stay reasonably standard, or at least within spec of orginal race team cars. its one of 1300 made so it seems wrong to mess it about too much.
However the rail would vibrate aginst the floor without the cut out....obviously a cut out makes the rail thinner which is why the cut out has been fully welded. should be stronger than the profiled 3 sided off the shelf things.
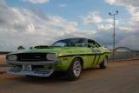
stance is how i wanted it, slight scope for settling
front end build will see the front come up about 1/2 and inch and bigger wheels
No more arse dragging, and eventually a slight nose down buisness like look
it looks more like the factory fresh chargers in pictures of old
Cheers Anton i'll be back for an exhaust
Dave
APD/Anton has completed work on my car
it went in with sagging rear springs and the guts of the front eye bushes hanging out, it was dragging its ass like a dog with worms.
aim
get the springs returned to As New
and
while its on the Lift put in some custom made chassis connectors, car has had splits round the rear screen throughout my ownership and the leaded joints at the top and bottom of the screen pillars are showing some cracks in the lead. obviously we have a bit of flex so some connectors made sense
luckily all aussie cars are blessed with the torque boxes front and rear that mopar reserved only for its cabriolets and Big HP applications in the US
so Anton had a good base to connect to it was just the bit in the middle, the passenger cabin that was showing the stresses of 40 years of flexing.
were the aims achived
Yes indeed
The car ride height was measured for consistencey corner to corner front to back.
the car was jacked up to achieve desiired ride height
a correction for spring settling (couple of months use) was added to the spec.
The springs were taken off
Anton made an assesment of the bushes,rears were fine, front were bad
Roger was enlisted to get some aussie front eye bushes in just to make sure we got the correct width and diameter
I bent the ear of Chris Mr WASP to get me a couple of packs of plastic interliners
£18 a pack of 6 in Black plastic is way cheaper than the $15 each item the australian suppliers want for their white version of the same thing.
Aussie springs have no Zinc interliners from the centre of the spring going forwards
so i got a bit of 0.8mm and cut it up
springs went out for retemper and reset
aim was so that we could see the wheel in the arch not have it looking like it was wearing spats.
previously the wheel needed to be posted in at a 45* angle when changing tyres...thats not supposed to be the case
and i have some bigger wheels to go on
spring packs rebuilt with the zinc and plastic, new centre bolt and clamps
and of course painted.
no creaking no clanking no thumping.
once that was done and the car was back on 4 wheels work on the chassis could comence
The aussie chargers have a both unique spring length and a unique length of floor pan, its basically a 60s A body floor with 8 -10 inches missing.
it has of course the usual rear passenger foot tray dip, its just closer to the front than you would normally see.
on many a US mopar, i.e the longer ones a chassis rail could be arronged miss it on this it won't
An off the shelf rail is expensive, twice the price of US ones and 1/2 a world away...
So Anton build some up and fully seam welded any section that needed to be cut out to get them round the floor and the RHD hand brake conduits fuel line etc. Remeber its a LHD floor pan with all the drivers side stuff tansfered to the RHS so you have fuel line and handbrake on the same side
the rails were welded in
they butt up to the cross members but also go over the torque box/chassis cross member for a strong join much like the hotchkiss set up does.
does it work
oh yes the combo of both changes is great
rear end feels solid and secure, it handles the bumps and changes of camber without the teeth jaring thumps of the previous set up
my shocks actually have a job to do now
i no longer feel like the steering wheel is just a device used to wag the tail end of the car about in a random manner.
all latteral movemnt of axle is gone or at least greatly reduced going by seat of pants feel
and the rear end follows the front immediately, if the reverse of scuttle shake (rear end shimmy?) exists its gone, there is less of the rear end slowly side stepping and wheel hopping over pumps and ripples as you blat round long slip road type corners
I like
Job done.
Anton kept me up to date on progress, any issues were discussed and he also sent a load of of photos
some pics
note the section out of the rail
i didn't want them welded into the floor, personal choice, car needs to stay reasonably standard, or at least within spec of orginal race team cars. its one of 1300 made so it seems wrong to mess it about too much.
However the rail would vibrate aginst the floor without the cut out....obviously a cut out makes the rail thinner which is why the cut out has been fully welded. should be stronger than the profiled 3 sided off the shelf things.
stance is how i wanted it, slight scope for settling
front end build will see the front come up about 1/2 and inch and bigger wheels
No more arse dragging, and eventually a slight nose down buisness like look
it looks more like the factory fresh chargers in pictures of old
Cheers Anton i'll be back for an exhaust
Dave
- Attachments
-
- stance1.jpg (209.27 KiB) Viewed 779 times
-
- chassis rail in place .jpg (238.49 KiB) Viewed 779 times
-
- chassis rail on bench.jpg (243.41 KiB) Viewed 779 times
Last edited by Dave999 on Tue Jul 16, 13 12:23 pm, edited 1 time in total.
The Greater Knapweed near the Mugwort by the Buckthorn tree is dying