db's 66 Belvedere ***FOR SALE***

Use this forum for all your builds in progress.

Moderator: Moderators

User avatar
db
Posts: 8368
Joined: Sun Apr 18, 04 10:50 pm
Location: Paul McQueen , N Wales

Post by db »

...and no, the drapes don't match the carpets ;)


I've flatted the whole panel with 240 to get rid of the orange peel in the primer and hit it with a guide coat.
I'm MUCH happier with this side. I have two tiny dents above the swage line which I missed when I was filling, but aside from that it's almost perfect :D
Attachments
Wing with guide coat.jpg
Wing with guide coat.jpg (178.25 KiB) Viewed 571 times
wing in primer 2.jpg
wing in primer 2.jpg (190.4 KiB) Viewed 571 times
Wing in primer.jpg
Wing in primer.jpg (153.1 KiB) Viewed 571 times
No-one will believe you...
User avatar
autofetish
Posts: 5599
Joined: Sat May 21, 11 6:43 am

Post by autofetish »

i could not do that i do not have the patients

alot of work there :thumbright: :thumbright:
The closer you are to death the more alive you are
User avatar
db
Posts: 8368
Joined: Sun Apr 18, 04 10:50 pm
Location: Paul McQueen , N Wales

Post by db »

It seems a LONG time since I had oily hands, it's nice to be back :D

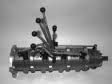
Did a bit of measuring & checking today.
I wanted to work out my true compression ratio, and check piston-to-valve clearance was ok.
For those like me who've never done this before...
I found an old vet's syringe and a bit of Perspex and CC-ed my head. I used Vaseline to seal the Perspex to the head and around the spark plug and valves. It's a bit of a fiddle to get the last air bubbles out and probably not accurate enough for a race motor, but fine for my purposes!

I pinched a bit of the girls' playdoh to measure the volume of the valve reliefs. I rolled it carefully into a ball and measured the diameter, then looked up the formula for the volume of a sphere.
Attachments
Measuring valve pockets.jpg
Measuring valve pockets.jpg (189.63 KiB) Viewed 838 times
CC-ing head.jpg
CC-ing head.jpg (184.6 KiB) Viewed 838 times
Ready to CC head.jpg
Ready to CC head.jpg (195.63 KiB) Viewed 838 times
No-one will believe you...
User avatar
db
Posts: 8368
Joined: Sun Apr 18, 04 10:50 pm
Location: Paul McQueen , N Wales

Post by db »

I measured the bore + stroke and added the whole lot up...

Cylinder volume = 45.46 ci
Valve reliefs = 0.27
Head = 4.30
Gasket (0.039") = 0.54
Total volume = 50.57"
Divide by
head + gasket 4.84
Comp ratio = 10.45:1

I bolted one head down to about 10lb/ft using the old gasket, dropped a piar of pushrods in and set the lash.
I turned the motor over and stripped it againg to check the playdoh.
I discovered playdoh is too springy and very inaccurate! Even with this I could tell my p-to-v is around 0.2" so plenty of safety margin there.

I checked out Edelbrock's site for head torque settings and found a useful PDF. I had to torque the bolts to 95 in 3 steps- 45 -65 -95.
Attachments
Edelbrock 6076 specs.pdf
(106.97 KiB) Downloaded 47 times
Heads torqued down..jpg
Heads torqued down..jpg (182.79 KiB) Viewed 825 times
Checking p-to-v.jpg
Checking p-to-v.jpg (202.96 KiB) Viewed 825 times
Ready to check p-to-v.jpg
Ready to check p-to-v.jpg (199.51 KiB) Viewed 825 times
No-one will believe you...
User avatar
Pete
Posts: 22109
Joined: Sun Apr 18, 04 10:49 pm
Location: MMA Chairman

Post by Pete »

Looks like you are making good progress!!!!

Nats??

Rev Limiter?

;)
Pete Wiseman; Cambridge.

Mopar by the grace of God
User avatar
db
Posts: 8368
Joined: Sun Apr 18, 04 10:50 pm
Location: Paul McQueen , N Wales

Post by db »

Pete wrote:Looks like you are making good progress!!!!

Nats?? No, no money :cry:
Rev Limiter? Yes- nice Mallory item from Dave B :thumbright:
I've just hit a snag- it never occurred to me when I bought the 2 spare rockers from Blue that they might be offset on the wrong side :roll:

I now desperately need two 1.5:1 Indy rockers identical to this one....
Attachments
Indy rocker. 1.5, left. 02.JPG
Indy rocker. 1.5, left. 02.JPG (181.23 KiB) Viewed 789 times
Indy rocker. 1.5, left. 01.JPG
Indy rocker. 1.5, left. 01.JPG (146.92 KiB) Viewed 789 times
No-one will believe you...
User avatar
Pete
Posts: 22109
Joined: Sun Apr 18, 04 10:49 pm
Location: MMA Chairman

Post by Pete »

In the immortal words of the Blues Brothers "Then I guess you are up S4it Creek".... :cry:

Will you be at the Nats, sans car then???
Pete Wiseman; Cambridge.

Mopar by the grace of God
User avatar
db
Posts: 8368
Joined: Sun Apr 18, 04 10:50 pm
Location: Paul McQueen , N Wales

Post by db »

Not sure yet money and time are very tight at the moment!
No-one will believe you...
Les Szabo

Post by Les Szabo »

Nice Paul, however I would've done the PTV check like you had it set up in picture 3 when you were checking volume......200 thou clearance with zero deck and a 556 cam? ....doubt it, but you've had no probs so it'll be ok. Thats a nice motor you got there which should punch out in excess of 400hp for sure. My stock iron headed 340 with .590 cam only made around 375.

Hope to see you at the Nats with or without car, preferably with!


Les
User avatar
db
Posts: 8368
Joined: Sun Apr 18, 04 10:50 pm
Location: Paul McQueen , N Wales

Post by db »

Thanks Les. Yeah I think the playdoh was so springy it kept it's original shape! There's definitely good clearance there though so I'm not worried.
I'd love to come but I'm not getting my hopes up- I've got a lot to do before the baby arrives in September!
No-one will believe you...
User avatar
db
Posts: 8368
Joined: Sun Apr 18, 04 10:50 pm
Location: Paul McQueen , N Wales

Post by db »

Well I've managed to get some sense out of Mister Grumpy at Indy and fingers crossed my rockers are on their way [-o<

Just noticed this is post number 1000 :woohoo:
No-one will believe you...
User avatar
db
Posts: 8368
Joined: Sun Apr 18, 04 10:50 pm
Location: Paul McQueen , N Wales

Post by db »

Back to bodywork while I'm waiting on the Indy bits...

I've prepped the last panel- pass door- all the surface rust ground off and POR15 applied.
I decided when I primer this, I may as well do all the touching up in one go so I hit the whole car with guide coat (matt black stove paint- dries in seconds, no clogging :thumbright: ) I'd never 'got' the need for guide coat but it's like magic- it reveals low spots you can't feel or see otherwise!
My sprayer mate Steve told me to get a Mirka Abranet sander to block the whole car. Brilliant- connects to your vac for dust free sanding!
I found a few little bits that needed a light fill, I now have the whole car ready for masking & a final primer (assuming the pass door is ok) :D
Attachments
Driver side sanded & filled.jpg
Driver side sanded & filled.jpg (181.94 KiB) Viewed 633 times
Scarlett and Willow dressed for sanding.jpg
Scarlett and Willow dressed for sanding.jpg (233.23 KiB) Viewed 633 times
Guide coat.jpg
Guide coat.jpg (189.38 KiB) Viewed 633 times
Passenger door ready for primer.jpg
Passenger door ready for primer.jpg (177.57 KiB) Viewed 633 times
No-one will believe you...
User avatar
db
Posts: 8368
Joined: Sun Apr 18, 04 10:50 pm
Location: Paul McQueen , N Wales

Post by db »

Primer tomorrow then :thumbright:
Attachments
Ready for final primer.jpg
Ready for final primer.jpg (200.88 KiB) Viewed 606 times
No-one will believe you...
User avatar
Pete
Posts: 22109
Joined: Sun Apr 18, 04 10:49 pm
Location: MMA Chairman

Post by Pete »

Great stuff, Paul :thumbright: :thumbright:
Pete Wiseman; Cambridge.

Mopar by the grace of God
Mossy68
Posts: 7679
Joined: Wed Jun 27, 12 6:57 pm
Location: Ongar Essex

Post by Mossy68 »

Looking good. I use Abranet. Great stuff. Lasts well also :thumbright:
It's all about Smiles per gallon !!!
68 Coronet sedan 500 4 door
Dodge Ram SRT 10
MMA-013
Post Reply