Well, I have finally got underway with my very rusty Challenger. Began stripping it down at the weekend to find more hidden rust and several nests full of insulation and acorns, although whatever lived there is long gone.
After I have stripped the front, the first job is to replace the front frame rail and torque bar mounting cross member!! The existing ones look like they have been damaged by a forklift I'd guess! Collected these from Dunc today and will be getting on with that once I have some chassis dimensions.
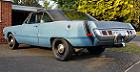
The plan with the car is to restore it back to original condition, or close to! It is a 1970 Challenger R/T, matching numbers, original colour is Plum Crazy, which is still visible in places, with a white side stripe which is long gone!
Nige's 70 Challenger R/T
Moderator: Moderators
-
nigeltaylor
- Posts: 59
- Joined: Thu Nov 28, 13 10:06 am
- Location: Southport
Nige's 70 Challenger R/T
- Attachments
-
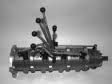
- Engine complete with rodent nest
- 036.JPG (190.17 KiB) Viewed 2902 times
-
- As the car arrived, somewhat rustier than expected!
- 026.JPG (209.78 KiB) Viewed 2902 times
Last edited by nigeltaylor on Mon Mar 10, 14 6:19 pm, edited 1 time in total.
-
nigeltaylor
- Posts: 59
- Joined: Thu Nov 28, 13 10:06 am
- Location: Southport
Looks like your gonna have your work cut out on that Nigel........Interesting bottom end arrangement too! 
Plumb crazy BB Chally.......
Look forward to seeing the progress.........
Plumb crazy BB Chally.......
Look forward to seeing the progress.........
Dave Tildesley.....MMA-081
72 Dodge Dart
73 Plymouth Duster - SOLD
I wanna go so FAST i think i'm going to DIE!..........Then i'll shift into second!
"My Car is a work in progress, Probably never gonna get finished, never gonna have the money to Bananarama!!"
72 Dodge Dart
73 Plymouth Duster - SOLD
I wanna go so FAST i think i'm going to DIE!..........Then i'll shift into second!
"My Car is a work in progress, Probably never gonna get finished, never gonna have the money to Bananarama!!"
-
autofetish
- Posts: 5599
- Joined: Sat May 21, 11 6:43 am
As Wil said, take LOTS of pictures, helps no end when you are putting it back together, especially if the time frame grows a little (like 19 years  ).
).
That is a superb project, best colour. Is it a manual car too?
That is a superb project, best colour. Is it a manual car too?
Matt Hollingsworth - Vehicle Registrar
Panther Pink 73 Aussie Charger 265 Hemi 4 spd
Challenger Sam Posey Tribute car
Panther Pink 73 Aussie Charger 265 Hemi 4 spd
Challenger Sam Posey Tribute car
great to see another one being revived 
Si
1970 Charger 500
383 | 4bbl | 727 column | PAS | PAB | buckets/buddy - check out my photos HERE
If you don't want another same old brand-new car ... you could be DODGE MATERIAL
1970 Dodge Charger Registry - https://www.1970chargerregistry.com/
1970 Charger 500
383 | 4bbl | 727 column | PAS | PAB | buckets/buddy - check out my photos HERE
If you don't want another same old brand-new car ... you could be DODGE MATERIAL
1970 Dodge Charger Registry - https://www.1970chargerregistry.com/
-
nigeltaylor
- Posts: 59
- Joined: Thu Nov 28, 13 10:06 am
- Location: Southport
-
nigeltaylor
- Posts: 59
- Joined: Thu Nov 28, 13 10:06 am
- Location: Southport
-
autofetish
- Posts: 5599
- Joined: Sat May 21, 11 6:43 am

-
autofetish
- Posts: 5599
- Joined: Sat May 21, 11 6:43 am
-
nigeltaylor
- Posts: 59
- Joined: Thu Nov 28, 13 10:06 am
- Location: Southport

That is some project you have on your hands there. I just don't have the time or patience to undertake a huge job like that, I wish I did as there cant be many other things that will give you so much satisfaction and pride once its finished. Good luck to you Sir hats of to you taking on something like that, look forward to following your build.
Petty Roadrunner 416 Stroker 4 Speed
*MMA-609*
"Built to be driven!"
Why me???
*MMA-609*
"Built to be driven!"
Why me???
-
autofetish
- Posts: 5599
- Joined: Sat May 21, 11 6:43 am
I had a welding glove as a packer then filler
The most enjoyable part of my build was the cutting and welding (not at the time but when I look back)
Do you plan to have everything sand blasted first( not flat panels )
I had mine blasted and 2k prinmer first was well worth it
The most enjoyable part of my build was the cutting and welding (not at the time but when I look back)
Do you plan to have everything sand blasted first( not flat panels )
I had mine blasted and 2k prinmer first was well worth it
The closer you are to death the more alive you are