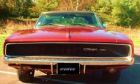
1973 Charger winter makeover thread
Moderator: Moderators
-
Captain Chaos
- Posts: 1913
- Joined: Sun Jan 23, 11 11:32 pm
- Location: Royal Tunbridge Wells

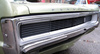
Likewise, handbrake not working, just goes to the floor, choke stuck on and car cover (halfords one) has just disintegrated covering the whole car in what looks like powdery snow.GJUK wrote: always something to do on them.
I took the dart out yesterday and always end up with a list of things I need to do.
Matt Hollingsworth - Vehicle Registrar
Panther Pink 73 Aussie Charger 265 Hemi 4 spd
Challenger Sam Posey Tribute car
Panther Pink 73 Aussie Charger 265 Hemi 4 spd
Challenger Sam Posey Tribute car
-
octanejunkie

- Posts: 399
- Joined: Thu Dec 04, 14 3:03 pm
- Location: Somerset
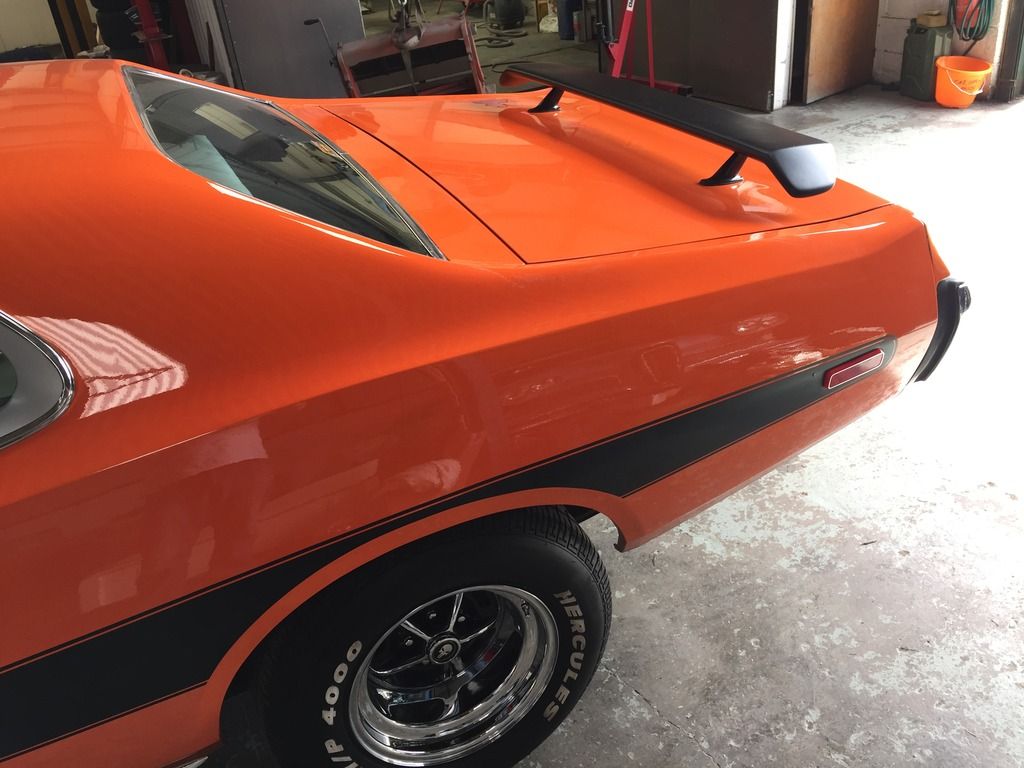
The spoiler arrived. Nice quality, sturdy metal supports, and made of really good chunky fibreglass with metal inserts. Shame there were no fixings for inside the boot.. They kind of leave at your own devices to sort those fixings out.
It was a bit bum clenching drilling into the freshly painted boot. Must have measured and re measured a dozen times!
Very pleased with the look though. Completes the back end of the car.
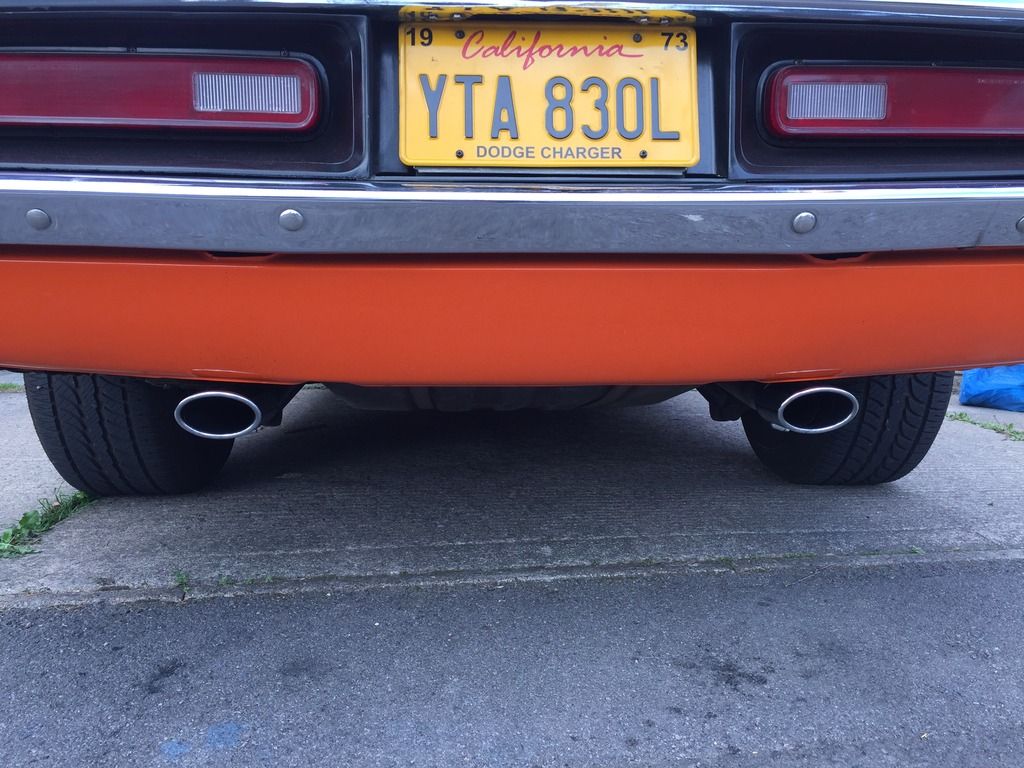
In my quest to deal with all the strange noises that this car makes, i was trying to track down an annoying squeak. Happened when you gave the car some gas. Most noticeable under load. Maybe a worn pulley or belt, maybe something in the transmission? It sounded like it was coming from the middle/back of the car. Anyway, to cut a long story short, i got a mate to listen as i revved the engine, and we actually narrowed it down to the exhaust tips... They were whistling under certain conditions, and sounded just like a squeak! Never had that before...
Ordered some new stainless oval tips, and the squeak is gone! Another one of the many noises off the list

"If its a job no man can survive, he's the man for the job"
-
ScottyDave
- Posts: 1674
- Joined: Sun Mar 08, 15 9:38 pm
- Location: Dave Evans: MMA 130, Worcestershire
-
octanejunkie
- Posts: 399
- Joined: Thu Dec 04, 14 3:03 pm
- Location: Somerset
ebay..
http://www.ebay.co.uk/itm/191794746022? ... EBIDX%3AIT
About £200 by the time it got here. Nice bit of kit though. Well made..
http://www.ebay.co.uk/itm/191794746022? ... EBIDX%3AIT
About £200 by the time it got here. Nice bit of kit though. Well made..
"If its a job no man can survive, he's the man for the job"
-
octanejunkie
- Posts: 399
- Joined: Thu Dec 04, 14 3:03 pm
- Location: Somerset
-
ScottyDave
- Posts: 1674
- Joined: Sun Mar 08, 15 9:38 pm
- Location: Dave Evans: MMA 130, Worcestershire

-
octanejunkie
- Posts: 399
- Joined: Thu Dec 04, 14 3:03 pm
- Location: Somerset
Hmmmm.. Photobucket threw a bit of a wobbly on me the other day. i couldn't use it for a few days. Just kept freezing and hanging, and not letting me into any of my albums.RobTwin wrote:Wing looks greatbut your pics on the previous page(s) seem to have lost their link....
Once it let me in again, the links on the last few pages just seemed to go AWOL. I haven't deleted anything. Bummer..
"If its a job no man can survive, he's the man for the job"
-
octanejunkie
- Posts: 399
- Joined: Thu Dec 04, 14 3:03 pm
- Location: Somerset
Not been on for a couple of weeks. Been on a course and then some long night shifts this week.
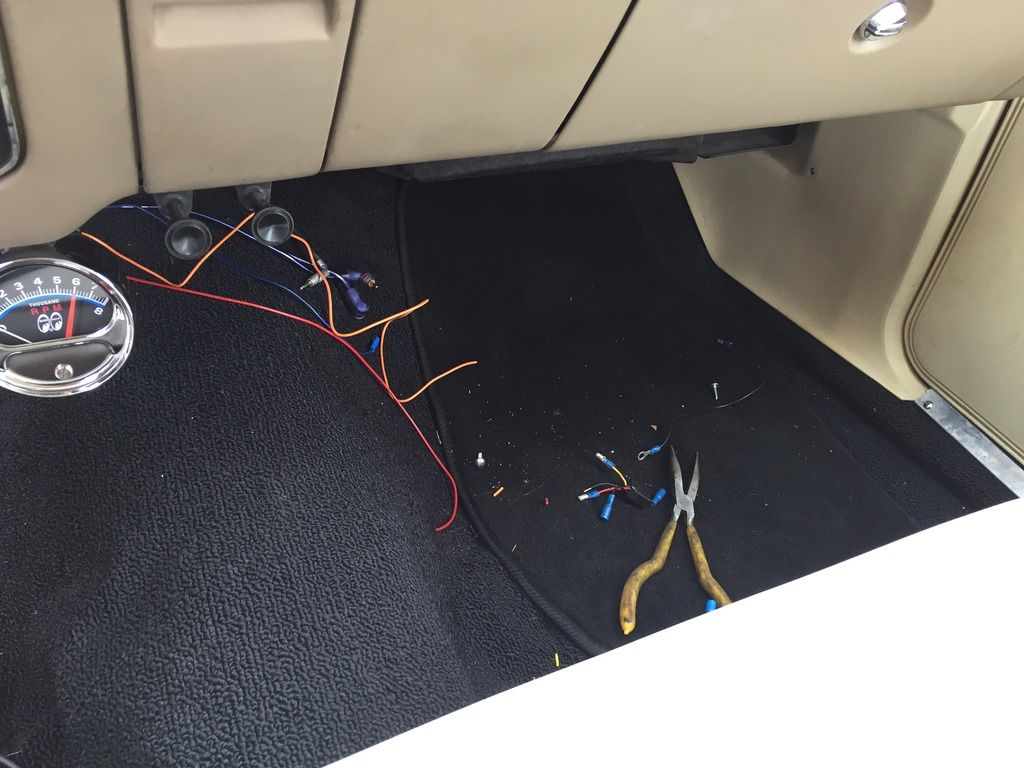
In my down time during the day this week i have finally got around to installing some stereo gear. Not having tunes has been doing my head in.
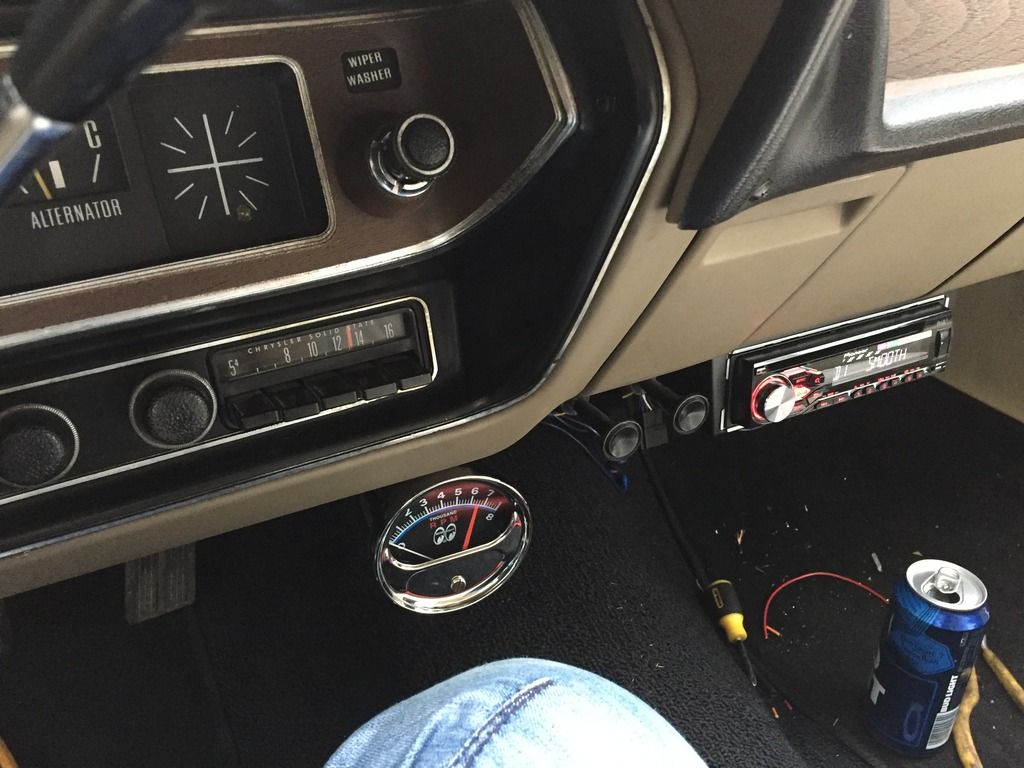
I'd taken the old Chrysler radio out and was going to put in one of those USA230 jobbies from custom autosound, but couldn't justify the expense. Plus the FM is not great on them, and i've heard various reports that the quality is not that great. I'd even toyed with the idea of cutting the dash for a normal DIN stereo , but i got some serious reprimands, and much tutting from an assortment of people.
Anyway, in the end i got a universal underdash mount from Halfrauds, and found a reasonable spot under the dash next to the vent knobs. In previous cars with column shift transmissions, i've mounted stereos in a pod on the transmission tunnel, but it can cause a few hair raising moments if you need to lean down and adjust anything while driving!
The original radio wiring supplied a switched 12v, and i ran a separate permanent 12v straight to the battery through a grommet in the firewall. The original radio support supplied the earth too.
There are no speakers running directly off the head unit, so there was no fannying about sorting that out.
When the car was in bits, and the interior was out, i took the opportunity to run RCA cables, and a chunky power cable under the carpets, and into the boot.
From my stash of head units, i had a nice Pioneer one (robbed from an old VW Golf i flipped last year) which also had the nice feature of DAB digital radio. Last time i installed an aftermarket DAB head unit, i had a devil of a time getting the DAB to pick up reliably. I went through several aerials, pulling trim out to run cables etc, and then was left with a pretty bodge looking antenna on the roof.
I wasn't going to bother hooking it up this time. However, whilst rooting through my electrical bits and bobs (for something unrelated) i came across an old GPS receiver from some old sat nav. It just so happened that the connector is the same as a DAB connector. After snipping the GPS dongle thingy off the end, i though that, even though the cable appears different, its still just in essence a coax cable with a core and a shield. I thought i'd have a go at splicing it in to the cars original, stock aerial. Blow me down if it didn't pick up DAB stations perfectly!
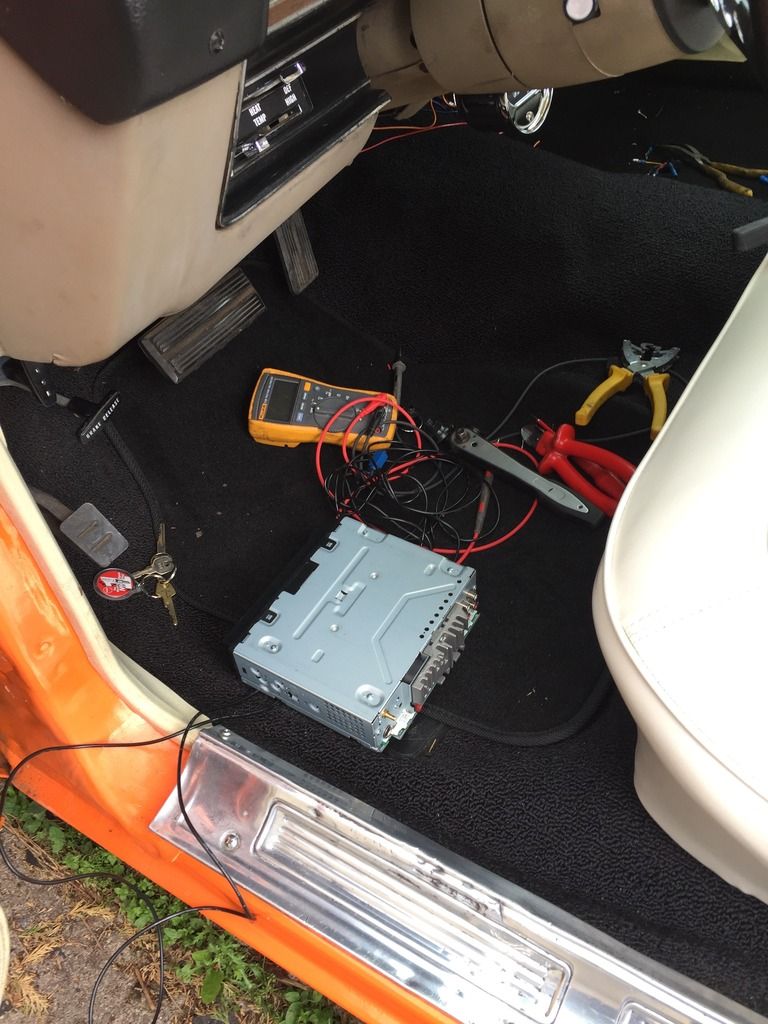
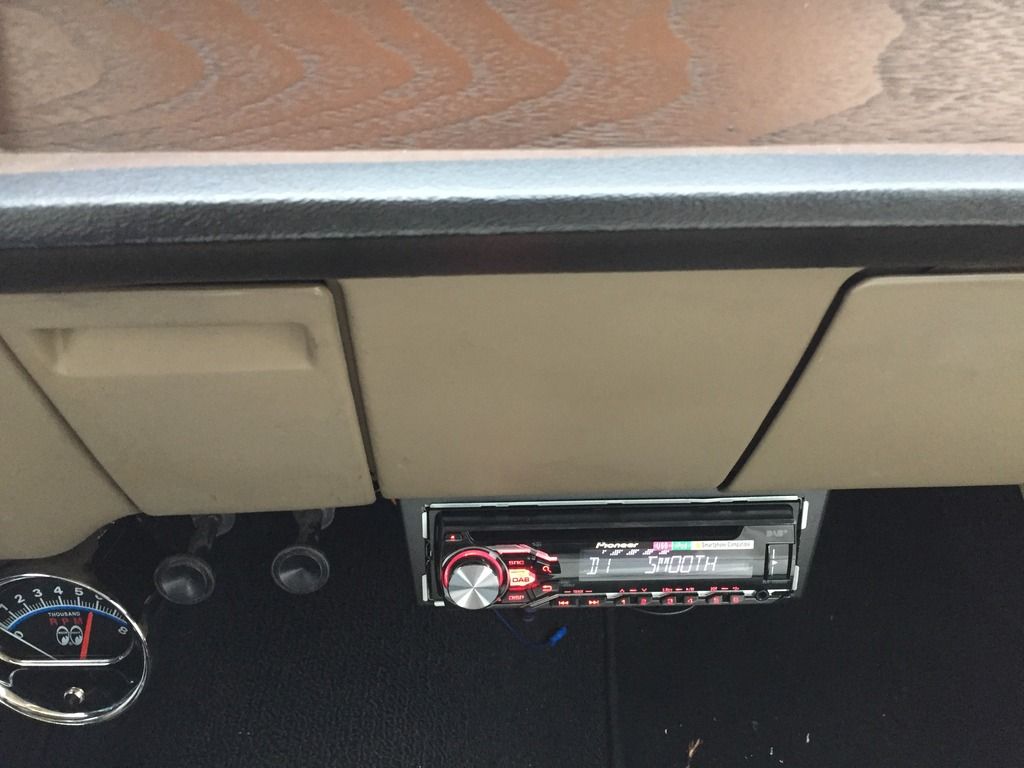
Still some finishing off to do, but the original radio is back in too and hooked up to the dash speaker so it can pick up screechy old AM signals too for a bit of nostalgia...
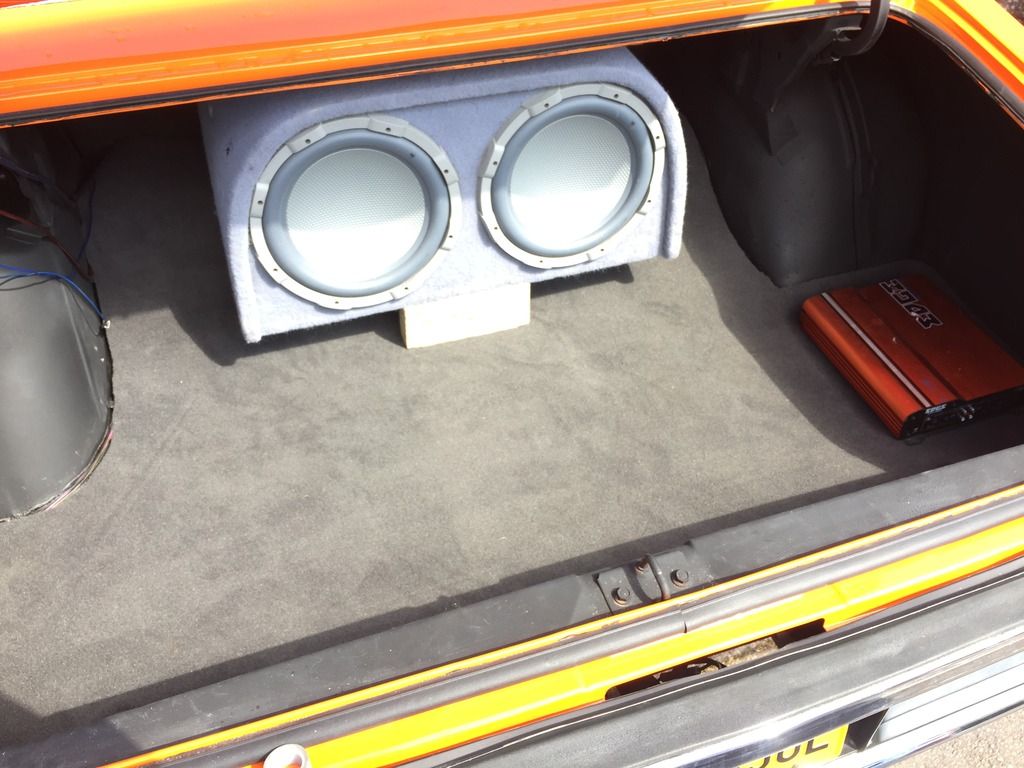
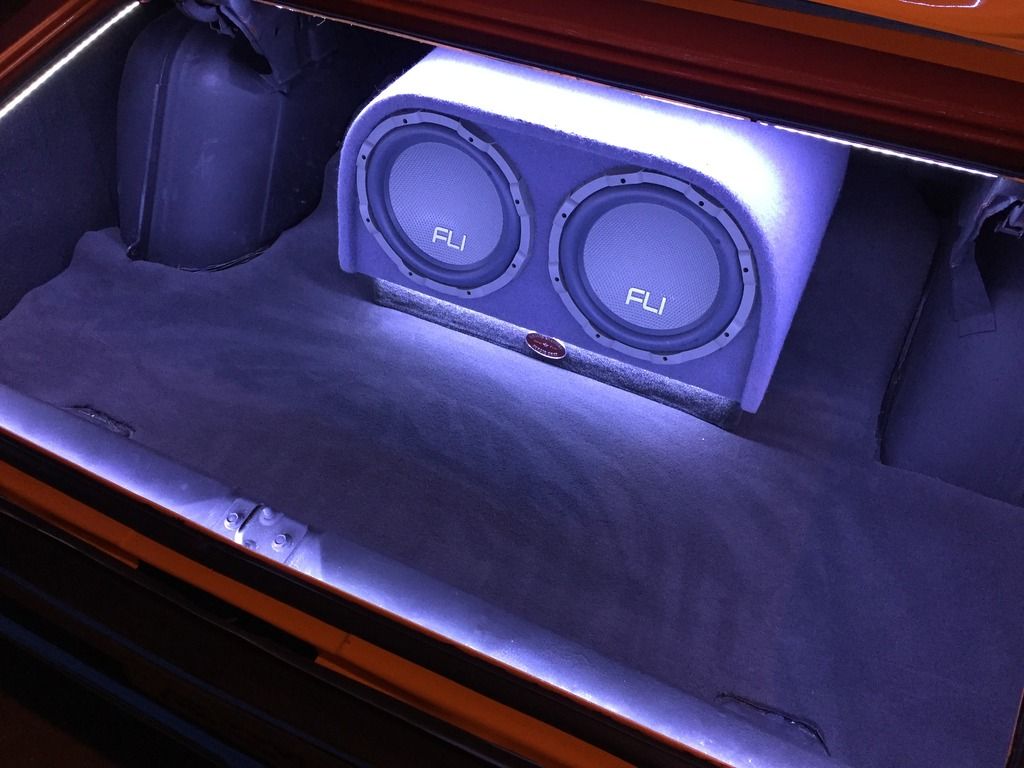
In the boot has been a bit of a mission. I had a large 2000W twin sub with its own amp that i wanted to put in. It fitted up quite well above the hump where the axle runs, but had a fair bit hanging over into the boot space.
Before i worried about that i had to mount a pair of 6X9's on the parcel shelf. Dodge had thoughtfully already provided some recess's for speakers, and i'd made provision for these when i'd redone the parcel shelf. The speakers plopped in quite nicely, but none of the holes for screws or fittings lined up. I had to drill up from inside the boot, as there's no room at all to get any tools in between the rear screen and parcel shelf. Then, in the back seat, i had to try and find the holes i'd drilled from inside the car to get screws through. it was a hot day and the sun was right on me. Very uncomfortable...
I toyed with mounting the amp for the 6X9's on the floor of the boot, but i wanted a clean look, and wanted to still be able to use the boot. In the end, i found that there was enough room for the amp behind the sub enclosure as it had a bit of a rake on it. I was able to cable tie the amp to the rear seat panel crossmember bits and hide it out the way.
If i was wasn't tight, i should have bought a nice little compact 2 channel amp to save space and hassle, but i already had a perfectly good meaty 4 channel amp kicking around in the garage.
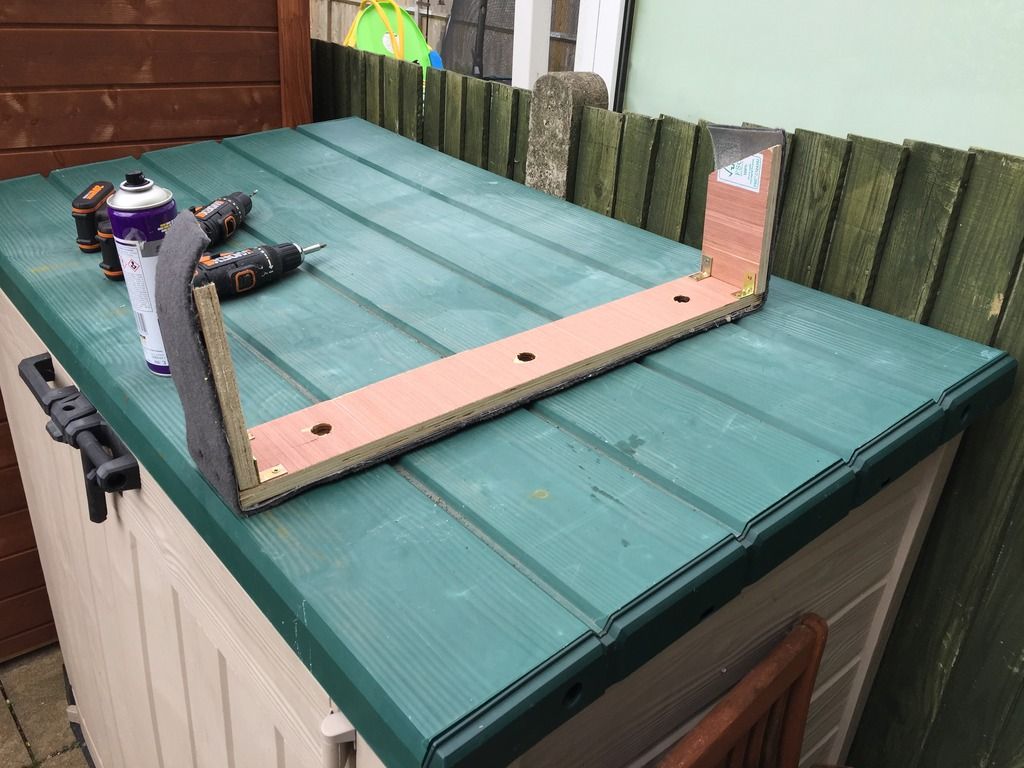
After taking a few measurements, i got the local DIY place to cut me some bits of chunky ply wood to make up a support for the front of the sub enclosure. I had some carpet off cuts left over from when i made up the boot floor carpet, and i used these to cover the make shift support. I then screwed this to the boot floor, as it would serve as the anchor for the sub, and minimize any further drilling of the cars structure.
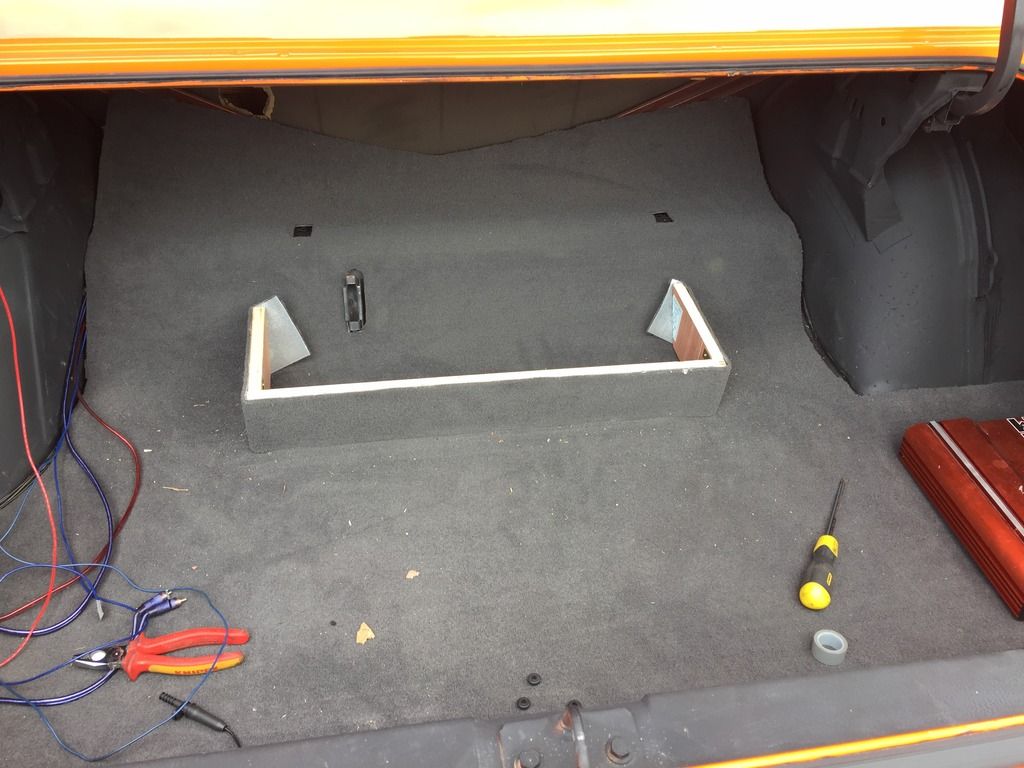
I was then able to slide the sub enclosure up and wire it in. All the cables are nicely hidden under the carpet and behind in the little recess behind the axle hump.
Trial fit
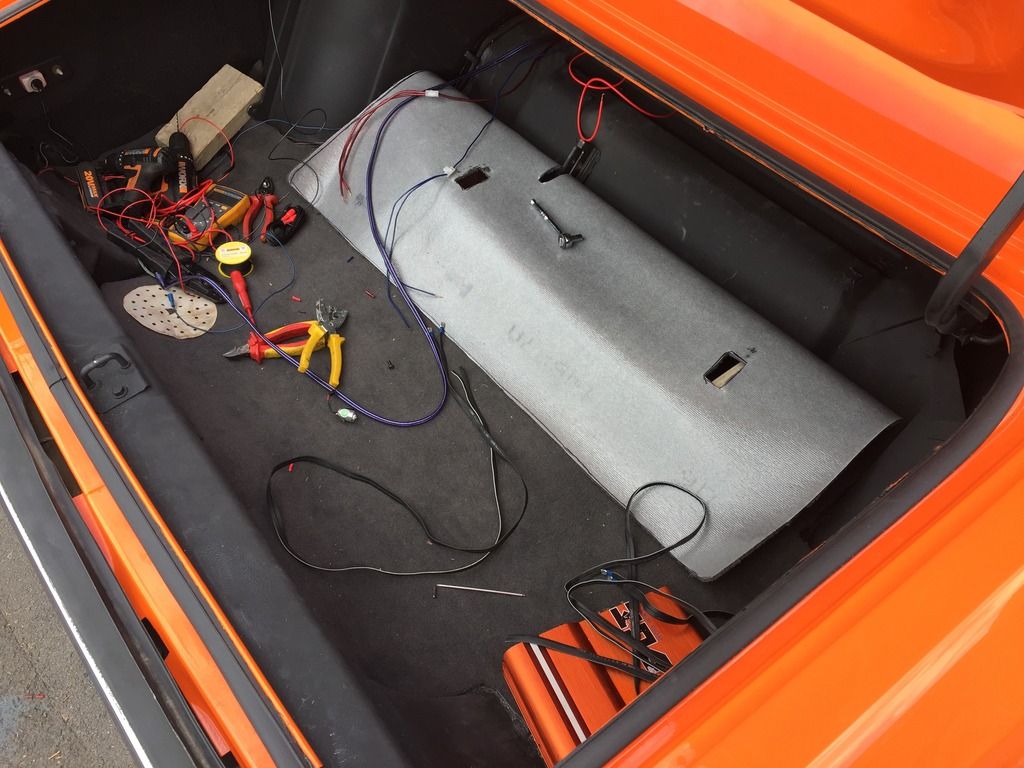
Once i was happy with the bracket, it was a case of wiring everything in.
My daughter and her boyfriend have their own little business selling LED commercial LED stuff. They gave me a 5m length of 12v LED tape. "cool white".
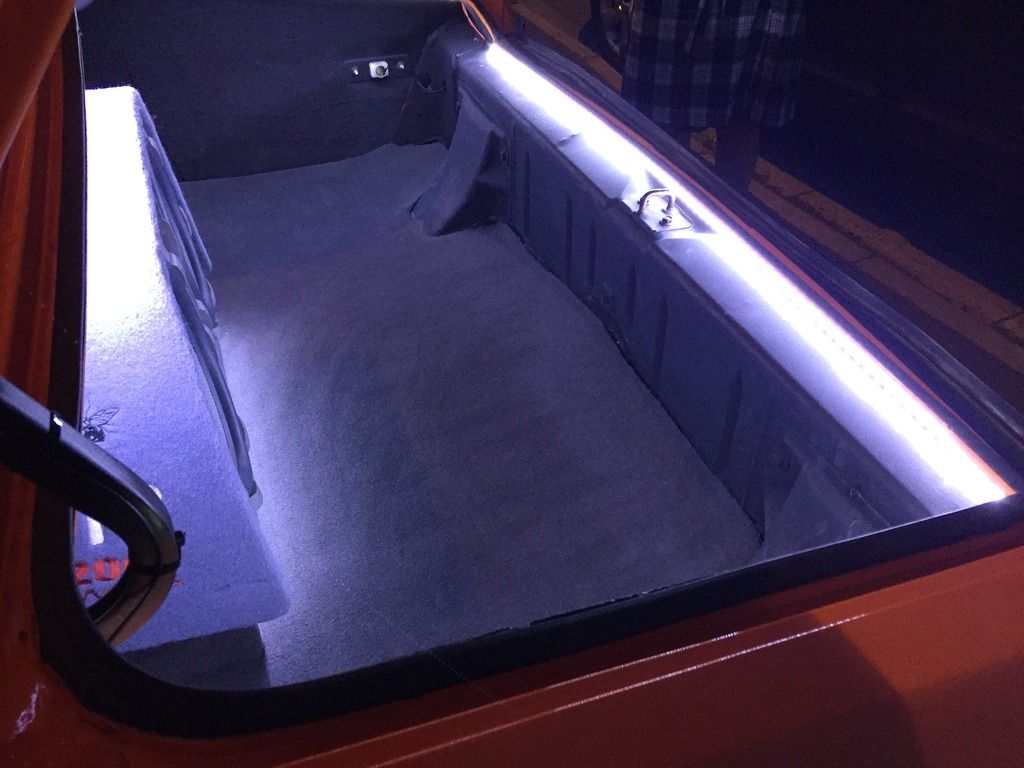
I cut various lengths to go around the mouth of the boot, and just had enough left over to put a strip underneath the ridge of the sub enclosure. It is a proper fiddly job soldering the lengths together with thin wires, and took me several hours to get it all done. Then more time spent routing the wires and concealing everything.
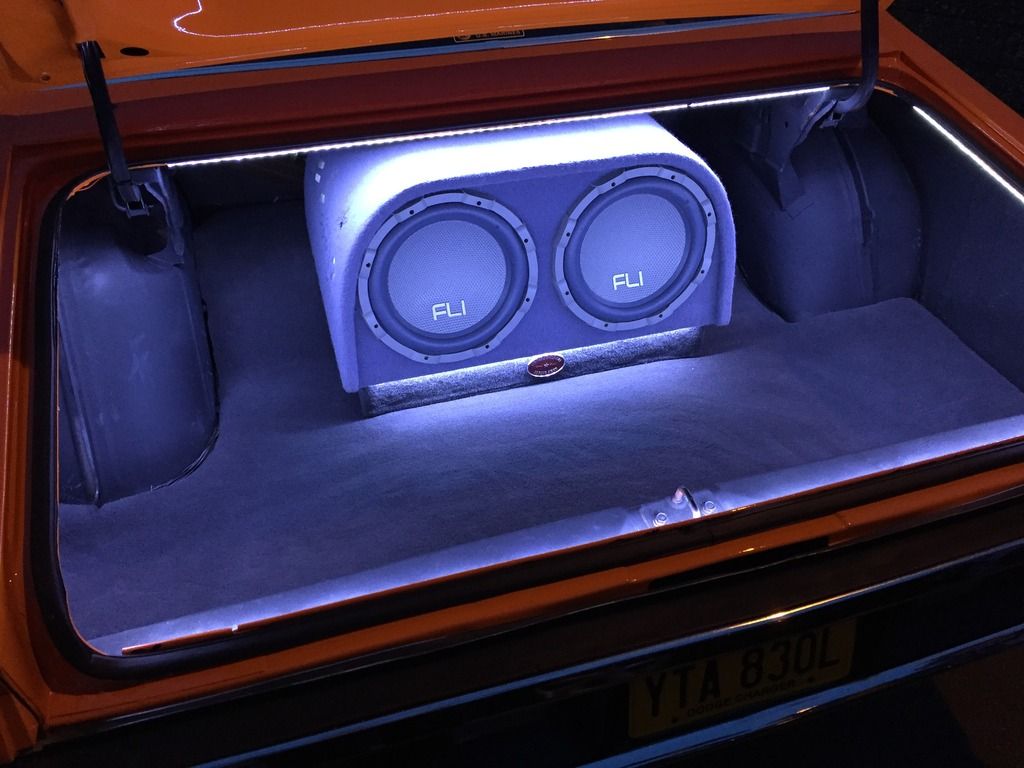
I used the original permanent 12v feed for the boot light, and ran the earth up to a plunger switch mounted in the boot lid next to the latch, so they operate only when the boot is opened.
I'd been on tenterhooks all evening waiting for it to get dark so i could go and have a look!!!
I'm well chuffed with the results. The colour of the LED's seems to complement the carpet colour perfectly, or at least i think so!
Plus it sounds awesome!
I wished i'd taken more photos, but i was cracking on and kept forgetting, sorry!
In my down time during the day this week i have finally got around to installing some stereo gear. Not having tunes has been doing my head in.
I'd taken the old Chrysler radio out and was going to put in one of those USA230 jobbies from custom autosound, but couldn't justify the expense. Plus the FM is not great on them, and i've heard various reports that the quality is not that great. I'd even toyed with the idea of cutting the dash for a normal DIN stereo
Anyway, in the end i got a universal underdash mount from Halfrauds, and found a reasonable spot under the dash next to the vent knobs. In previous cars with column shift transmissions, i've mounted stereos in a pod on the transmission tunnel, but it can cause a few hair raising moments if you need to lean down and adjust anything while driving!
The original radio wiring supplied a switched 12v, and i ran a separate permanent 12v straight to the battery through a grommet in the firewall. The original radio support supplied the earth too.
There are no speakers running directly off the head unit, so there was no fannying about sorting that out.
When the car was in bits, and the interior was out, i took the opportunity to run RCA cables, and a chunky power cable under the carpets, and into the boot.
From my stash of head units, i had a nice Pioneer one (robbed from an old VW Golf i flipped last year) which also had the nice feature of DAB digital radio. Last time i installed an aftermarket DAB head unit, i had a devil of a time getting the DAB to pick up reliably. I went through several aerials, pulling trim out to run cables etc, and then was left with a pretty bodge looking antenna on the roof.
I wasn't going to bother hooking it up this time. However, whilst rooting through my electrical bits and bobs (for something unrelated) i came across an old GPS receiver from some old sat nav. It just so happened that the connector is the same as a DAB connector. After snipping the GPS dongle thingy off the end, i though that, even though the cable appears different, its still just in essence a coax cable with a core and a shield. I thought i'd have a go at splicing it in to the cars original, stock aerial. Blow me down if it didn't pick up DAB stations perfectly!


Still some finishing off to do, but the original radio is back in too and hooked up to the dash speaker so it can pick up screechy old AM signals too for a bit of nostalgia...
In the boot has been a bit of a mission. I had a large 2000W twin sub with its own amp that i wanted to put in. It fitted up quite well above the hump where the axle runs, but had a fair bit hanging over into the boot space.
Before i worried about that i had to mount a pair of 6X9's on the parcel shelf. Dodge had thoughtfully already provided some recess's for speakers, and i'd made provision for these when i'd redone the parcel shelf. The speakers plopped in quite nicely, but none of the holes for screws or fittings lined up. I had to drill up from inside the boot, as there's no room at all to get any tools in between the rear screen and parcel shelf. Then, in the back seat, i had to try and find the holes i'd drilled from inside the car to get screws through. it was a hot day and the sun was right on me. Very uncomfortable...
I toyed with mounting the amp for the 6X9's on the floor of the boot, but i wanted a clean look, and wanted to still be able to use the boot. In the end, i found that there was enough room for the amp behind the sub enclosure as it had a bit of a rake on it. I was able to cable tie the amp to the rear seat panel crossmember bits and hide it out the way.
If i was wasn't tight, i should have bought a nice little compact 2 channel amp to save space and hassle, but i already had a perfectly good meaty 4 channel amp kicking around in the garage.
After taking a few measurements, i got the local DIY place to cut me some bits of chunky ply wood to make up a support for the front of the sub enclosure. I had some carpet off cuts left over from when i made up the boot floor carpet, and i used these to cover the make shift support. I then screwed this to the boot floor, as it would serve as the anchor for the sub, and minimize any further drilling of the cars structure.
I was then able to slide the sub enclosure up and wire it in. All the cables are nicely hidden under the carpet and behind in the little recess behind the axle hump.
Trial fit

Once i was happy with the bracket, it was a case of wiring everything in.


My daughter and her boyfriend have their own little business selling LED commercial LED stuff. They gave me a 5m length of 12v LED tape. "cool white".
I cut various lengths to go around the mouth of the boot, and just had enough left over to put a strip underneath the ridge of the sub enclosure. It is a proper fiddly job soldering the lengths together with thin wires, and took me several hours to get it all done. Then more time spent routing the wires and concealing everything.
I used the original permanent 12v feed for the boot light, and ran the earth up to a plunger switch mounted in the boot lid next to the latch, so they operate only when the boot is opened.
I'd been on tenterhooks all evening waiting for it to get dark so i could go and have a look!!!
I'm well chuffed with the results. The colour of the LED's seems to complement the carpet colour perfectly, or at least i think so!
Plus it sounds awesome!
I wished i'd taken more photos, but i was cracking on and kept forgetting, sorry!


"If its a job no man can survive, he's the man for the job"