If only you had a stick-on 'Challenger' badge, Colin... like the one you removed from the boot lid!raven68 wrote: Ok, its still a cheap plastic cover and we've lost the vents and the badge but Joe Public don't know the difference from 3ft
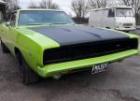
70 Challenger Western Sport Special
Moderator: Moderators
-
mustangbooks

- Posts: 676
- Joined: Wed Sep 05, 12 11:51 am
- Location: Feltham
- Contact:
Last edited by mustangbooks on Tue Jan 21, 14 10:14 pm, edited 1 time in total.

Another little tidy up job was done on the centre console and the door inserts where the wood effect stuff was peeling off round the edges and it just let down the whole interior feel so easy job to remove the centre console pate, strip off the wood effect and polish up what was left... Yes, there is a flaw in the metal plate for some reason but the whole thing looks much better in the flesh than it used to. I know you can get the wood applique kits but were not going down the factory restoration route so it may get painted or carbon fibre, don't know yet.........
Console panel on the bench ready for some tedious scraping. We used a mixture of heat gun and cellulose thinners to help soften the stuff... Got a bit dizzy on the fumes..

And then it was back in the car - simple job requiring a bit of elbow grease that cost nothing and then the same was done to remove the wood effect on the door inserts that you can see....

Console panel on the bench ready for some tedious scraping. We used a mixture of heat gun and cellulose thinners to help soften the stuff... Got a bit dizzy on the fumes..
And then it was back in the car - simple job requiring a bit of elbow grease that cost nothing and then the same was done to remove the wood effect on the door inserts that you can see....
Haha yeah, where did that boot badge go........mustangbooks wrote: If only you had a stick-on 'Challenger badge, Colin... like the one you removed from the boot lid!
No, its all part of dechroming and debadging the car to make it look better in our opinion of course - less is more is the motto, and its cheaper that way as well
Looking great!!! Amazing how these little jobs all mount up and make big difference. That dash pad is really good! I find that doing all these little bits helps to get to know the car and how its all put together.
Great to see you all enjoying her and keep it coming please...great thread!!
Great to see you all enjoying her and keep it coming please...great thread!!
Bat Girl Stalker Living Petes Dream

Over the last couple of weeks work has progressed nicely on cleaning up all the front suspension parts and giving them a coat of paint and getting it all ready for re-installation...... The idea behind laying it all out was to keep the left separate from the right side which might seem a bit OCD but we didn't want to get confused !

How on earth this mess of a top ball joint got through an MOT 12 months ago is quite staggering. Other side wasn't much better either

SO now we have all new bushes, ball joints, bump stops and track rod ends, new shocks, roll bar bushes, etc. We had to order new roll bar drop links that weren't in the kit from WASP plus some new torsion bar dust boots and wait for these to be sent over from Summit Racing. Typically, when you really need something so insignificant as torsion bar dust boots before you can really put anything back on the car, it was the first parcel I have ever 'imported' that got lost.... The Summit address label was wrong so it came all the way to Bristol, couldn't be delivered so was sent back to the USA. However we did manage to intercept it near Heathrow, got it properly addressed and re-delivered after 10 days chasing it around.
Finally this weekend the front suspension & steering joints was all bolted back into place.... kinda makes the rest of the chassis & underbody look real bad now !! Roll bar will be connected once its all back on its wheels and on the deck

The original chrome on the front and rear bumpers was well past its best so this suited our plans to paint the bumpers body colour as well. In addition I have a pet hate for bumper bolts so the bolt holes have been welded up for that smooth clean look. The bumper was then scuffed all over with the DA sander, degreased and then sprayed with high build etch primer and is now back on the car temporarily waiting for paint

How on earth this mess of a top ball joint got through an MOT 12 months ago is quite staggering. Other side wasn't much better either
SO now we have all new bushes, ball joints, bump stops and track rod ends, new shocks, roll bar bushes, etc. We had to order new roll bar drop links that weren't in the kit from WASP plus some new torsion bar dust boots and wait for these to be sent over from Summit Racing. Typically, when you really need something so insignificant as torsion bar dust boots before you can really put anything back on the car, it was the first parcel I have ever 'imported' that got lost.... The Summit address label was wrong so it came all the way to Bristol, couldn't be delivered so was sent back to the USA. However we did manage to intercept it near Heathrow, got it properly addressed and re-delivered after 10 days chasing it around.
Finally this weekend the front suspension & steering joints was all bolted back into place.... kinda makes the rest of the chassis & underbody look real bad now !! Roll bar will be connected once its all back on its wheels and on the deck
The original chrome on the front and rear bumpers was well past its best so this suited our plans to paint the bumpers body colour as well. In addition I have a pet hate for bumper bolts so the bolt holes have been welded up for that smooth clean look. The bumper was then scuffed all over with the DA sander, degreased and then sprayed with high build etch primer and is now back on the car temporarily waiting for paint
Fridays are my day off from my normal weekday job so that's the only day we get to work on the Challenger apart from the occasional Saturday when the missus goes out with her friends, so all the pics posted so far have been of work done over the last couple of months when we took the car off the road at the start of December.
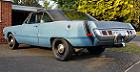
Here are a few of the work done on the rear end. This Challenger has a full width pressed formed aluminium tail trim across the rear lights and wing ends instead of normal chrome tail trims. Only the boot has a chrome strip. The aluminium panel was badly squashed on the corners and had been poorly repaired with filler in the past..............this is the offside corner /edge which was the worst side.

We toyed with the idea of buying a new 3 piece chrome trim and spraying that body colour as per the front trims, but in the end have decided to leave the chrome trim off, fill all the body holes and re-profile the ends of the wings which will be painted body colour. This has taken a lot of work over xmas to finally get to this point.... Might not be to everyones taste but we'll see what it looks like when its finished......
Starting point of course!

Work in progress reshaping the corners

And then tonight got the first coat of high build primer on to see what it really looked like and was pretty pleased with the result.


Once the whole rear end has been sprayed in Sublime Green we will then black out the taillight area in gloss black..........or maybe satin black... not sure yet. Couple of Fridays ago the wheels were also lightly sanded back and sprayed gloss black as well.......... just need to buff up the tyres now! The standard centre caps will also be sprayed black and then the chrome trim rings will be refitted for the final look.
 [/img]
Here are a few of the work done on the rear end. This Challenger has a full width pressed formed aluminium tail trim across the rear lights and wing ends instead of normal chrome tail trims. Only the boot has a chrome strip. The aluminium panel was badly squashed on the corners and had been poorly repaired with filler in the past..............this is the offside corner /edge which was the worst side.
We toyed with the idea of buying a new 3 piece chrome trim and spraying that body colour as per the front trims, but in the end have decided to leave the chrome trim off, fill all the body holes and re-profile the ends of the wings which will be painted body colour. This has taken a lot of work over xmas to finally get to this point.... Might not be to everyones taste but we'll see what it looks like when its finished......
Starting point of course!
Work in progress reshaping the corners
And then tonight got the first coat of high build primer on to see what it really looked like and was pretty pleased with the result.
Once the whole rear end has been sprayed in Sublime Green we will then black out the taillight area in gloss black..........or maybe satin black... not sure yet. Couple of Fridays ago the wheels were also lightly sanded back and sprayed gloss black as well.......... just need to buff up the tyres now! The standard centre caps will also be sprayed black and then the chrome trim rings will be refitted for the final look.
[/img]
raven68 wrote:Another little tidy up job was done on the centre console and the door inserts where the wood effect stuff was peeling off round the edges and it just let down the whole interior feel so easy job to remove the centre console pate, strip off the wood effect and polish up what was left... Yes, there is a flaw in the metal plate for some reason but the whole thing looks much better in the flesh than it used to. I know you can get the wood applique kits but were not going down the factory restoration route so it may get painted or carbon fibre, don't know yet.........
Console panel on the bench ready for some tedious scraping. We used a mixture of heat gun and cellulose thinners to help soften the stuff... Got a bit dizzy on the fumes..
And then it was back in the car - simple job requiring a bit of elbow grease that cost nothing and then the same was done to remove the wood effect on the door inserts that you can see....
This looks all too familiar
We did a cheap fix on our Satellite's console a couple of years ago. Recovered the existing woodgrain with 'fablon' (self-adhesive woodgrain vinyl) and it came out a treat.
Check it
http://www.moparuk.com/forums/viewtopic ... c&start=45
Page 4 onwards

Nice subtle mod on the rear........Chip Foose would definately approve!
Look forward to the progress on this.
Subtle updates and hotrodding =
Look forward to the progress on this.
Subtle updates and hotrodding =
Dave Tildesley.....MMA-081
72 Dodge Dart
73 Plymouth Duster - SOLD
I wanna go so FAST i think i'm going to DIE!..........Then i'll shift into second!
"My Car is a work in progress, Probably never gonna get finished, never gonna have the money to Bananarama!!"
72 Dodge Dart
73 Plymouth Duster - SOLD
I wanna go so FAST i think i'm going to DIE!..........Then i'll shift into second!
"My Car is a work in progress, Probably never gonna get finished, never gonna have the money to Bananarama!!"
Nothing wrong with that cheap fix - nice work.... just been browsing through all your other pages and admiring the neat work... Great stuffRobTwin wrote:
This looks all too familiar
We did a cheap fix on our Satellite's console a couple of years ago. Recovered the existing woodgrain with 'fablon' (self-adhesive woodgrain vinyl) and it came out a treat.

Blimey, February has now passed so its time for some updates....
Firstly we got a set of non a/c pulleys from Duncan W and got them fitted which enabled us to remove the AC compressor from its very conspicuous place on top of the engine. That compressor weighed in at 12kgs !! The clearance on the deeper water pump pulley was very tight and I was sure it was going to rub on the bolts but once everything was properly tightened up in place it was fine....... Now we can see the engine !! I am sure that someone who can do the maths on ratios could tell me why there is a smaller crank pulley and a larger water pump pulley and what is now running faster or slower but anyway..... job done !
Firstly we got a set of non a/c pulleys from Duncan W and got them fitted which enabled us to remove the AC compressor from its very conspicuous place on top of the engine. That compressor weighed in at 12kgs !! The clearance on the deeper water pump pulley was very tight and I was sure it was going to rub on the bolts but once everything was properly tightened up in place it was fine....... Now we can see the engine !! I am sure that someone who can do the maths on ratios could tell me why there is a smaller crank pulley and a larger water pump pulley and what is now running faster or slower but anyway..... job done !
- Attachments
-
- New non a/c crank pulley on the right
- 005a.jpg (151.74 KiB) Viewed 951 times
-
- New non a/c water pump pulley on the right which is deeper in depth
- 001a.jpg (155.88 KiB) Viewed 951 times