70 Challenger Western Sport Special

Use this forum for all your builds in progress.

Moderator: Moderators

User avatar
raven68
Posts: 261
Joined: Fri Jan 03, 14 10:18 am
Location: Bristol
Contact:

70 Challenger Western Sport Special

Post by raven68 »

As per intro thread in the Lounge section I bought this Challenger back last March 2013. It was all running, MOT'd and driving fine, but is suffering from rusty rear arches, lower rear quarters, deck filler panel and the lower rears of the front wings plus a few other dings and scratches...anyway it looked OK from 20ft and the drive back from Hounslow along the M4 to Bristol was real fun....

My youngest lad (24) went part ownership on the car on the basis that he insured it and drove it and did all the maintenance & upgrades on it. The plan is to Keep It On the Road apart from essential work during the winter only.

First job was to replace the heater valve as this had broken and had been bypassed. Next job was to remove all the A/C as this had ceased working years ago. Engine bay below before we started...

Image

And whilst the A/C was being stripped out, the opportunity was taken to sort out the spiders web of wiring and relocate the battery cut off switch. The previous owner had spent over £6700 in the last four years, £2500 of which was having a replacement engine fitted (shame he let the original engine go) and the rest was pretty well spent on re-wiring, alternator issues, bad starting, ignition leads and other electrical items. Judging by the endless invoices from a well known American spares business in South London it looks to me as though he was taken advantage of.

AT the time we couldn't figure out how to remove the AC compressor and re-route the various fan belts so that's a future task.

Image

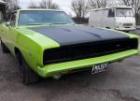
The car was used throughout the summer with no problems at all other than replacing the Voltage Regulator as the battery was either being overcharged and boiling or it went flat! the new VR and a new wiring plug soon had it sorted. The We took it to the local Queens Square meeting, 2nd Sunday of the month quite regularly. First time there and what turned up but another Challenger.........the Plum Crazy 71 has just been totally restored by the local bodyshop owner so it was good to make that contact for any future major bodywork or repaint.

Image

Early December the car has been taken off the road for a full front suspension rebuild and a few bodywork and paint issues....The main point is to keep it on the road and NOT do a full bodywork strip and repaint so only some of the bodywork will get done.

Three years ago I came across this garage space for rent just 10 mins from home and with my two boys this is where we disappear to when we have some spare time to mess around with our cars... Here's one last summer

Image

SO the Challenger is now up on stands with the front suspension stripped out. All new bushes and joints are going back in with all parts blasted and painted. Got the front suspension kit from Chris at WASP and new shocks from Rock Auto plus a couple of new front tyres from North Hants Tyres as the fronts had scrubbed out due to poor alignment.

Image

This challenger still had the LH threaded wheel studs on one side. The threads were very poor and a few were almost stripped of thread and the nuts had seen better days. All new RH threaded studs have now been fitted to all four corners.

Offside rear arch didn't look too bad and I was dying to have a poke with a screwdriver

Image

Image

So for now I am just going to patch this up. Ordinarily I would order a replacement panel but that would mean major bodywork for a few months to do both sides, so for now its make do and mend. I fabricated a small patch and welded it in. The chrome wheel arch trims will not be refitted.

Image

And after a little bit of filler and sanding I got an acceptable result that will last for a couple of seasons before we need to do a quarter panel replacement. All the inner arch has also been cleaned back to bare metal and will be repainted, plus there is a small hole into the cill which I will weld up.

Image

Well that will do for now. Other plans are to satin black the grille, paint the bumpers body colour, paint the standard wheels black, remove the badges, de-chrome the rear end, black out the taillight panel and tart up the various little bits of paint damage here and there..... More pics will follow....... :)
User avatar
Cannonball
Posts: 17242
Joined: Sun Apr 18, 04 11:26 pm
Location: crewe, cheshire
Contact:

Post by Cannonball »

brilliant stuff and i reckon a good way to do the repairs keep it up and mobile for as long as possible so many of these cars get stripped and never get done, if you can fathom out what pulleys etc you might need i have loads of that stuff to bin that big ole compressor,
www.dwatts80.fsnet.co.uk

WATTS RACING TRANSMISSIONS, CLOBBER THE COMPETITION ITS CLOBBERIN TIME

OFTEN OUTNUMBERED NEVER OUTGUNNED,

HEY WHATS THE TOP END ON THAT SUPERSPORTS. UNLIMITED,

I HAVE A NVQW

LIFE GOES PRETTY FAST, IF YOU DONT LOOK ROUND A WHILE YOU MAY JUST MISS IT,

THE PASS IS THE JUICE,

LOVED BY FEW,
HATED BY MANY
RESPECTED BY ALL
User avatar
raven68
Posts: 261
Joined: Fri Jan 03, 14 10:18 am
Location: Bristol
Contact:

Post by raven68 »

Cheers Duncan - yes, already learned that lesson having spent 2yrs rebuilding a WW2 Willys Jeep and nearly 1yr rebuilding a 69 Camaro shell with about another 2yrs to go.... :oops: the idea was to have some fun not be buried in rusty metal :lol:

With regard to getting rid of the AC compressor all I need is a deeper water pump pulley from what I have read? Second pic below shows the current shallow pulley that runs the fan off the first groove on the crank pulley. Second groove on the crank pulley runs the power steering. Third and fourth groove runs the AC and the Alternator. SO what is needed is a deeper water pump pulley that puts the fanbelt behind the power steering belt - see the first pic for a non-AC 'deep' water pump pulley -- if you have one PM me on here please?
Attachments
005a.jpg
005a.jpg (239.21 KiB) Viewed 2148 times
Non AC engine arrangement 1.jpg
Non AC engine arrangement 1.jpg (253.11 KiB) Viewed 2148 times
Mossy68
Posts: 7679
Joined: Wed Jun 27, 12 6:57 pm
Location: Ongar Essex

Post by Mossy68 »

The start of a great thread.
Look forward to the progress :thumbright:
It's all about Smiles per gallon !!!
68 Coronet sedan 500 4 door
Dodge Ram SRT 10
MMA-013
User avatar
raven68
Posts: 261
Joined: Fri Jan 03, 14 10:18 am
Location: Bristol
Contact:

Post by raven68 »

This is another type of water pump pulley but they both do the same job.
Attachments
non ac pulley a.jpg
non ac pulley a.jpg (118.64 KiB) Viewed 2128 times
User avatar
mustangbooks
Posts: 676
Joined: Wed Sep 05, 12 11:51 am
Location: Feltham
Contact:

Re: 70 Challenger Western Sport Special

Post by mustangbooks »

raven68 wrote:....The main point is to keep it on the road and NOT do a full bodywork strip and repaint so only some of the bodywork will get done.
Yep, great idea!
raven68 wrote: Other plans are to satin black the grille,
Yep, great idea!
raven68 wrote:paint the bumpers body colour,
Yep, great idea!
raven68 wrote:black out the taillight panel and tart up the various little bits of paint damage here and there.....
Yep, great idea!

... well, that's pretty much what I'm doing with mine, anyway... :D
User avatar
raven68
Posts: 261
Joined: Fri Jan 03, 14 10:18 am
Location: Bristol
Contact:

Post by raven68 »

Ok, first - how do you do the multiple quote answers ? I cant figure that out on here yet........ :?

Secondly - it was your approach to fixing one piece at a time that showed me there is another way to be honest ;) This car will get restored one panel at a time !!

Most of the cars I have had have been torn down and then spent ages in a cold garage putting them back together and that was never part of the plan. The idea is to enjoy driving them and get out and about for some fresh air, beer and burgers and meet other car guys :thumbright:
User avatar
raven68
Posts: 261
Joined: Fri Jan 03, 14 10:18 am
Location: Bristol
Contact:

Bodywork stuff to sort out.....

Post by raven68 »

Despite the last owner saying this car was kept in a garage I'm pretty sure this sat outside most of time to have suffered this amount of rusty stuff, but the car is 44 yrs old so who knows..... SO here are the main rusty bits we shall tackle slowly one panel at a time........

Stress crack on the drivers side.....also not apparent in this picture is the leaded joint on the roof pillar which shows signs of bulging

Image

Drivers side lower rear wing....... should be surface rust and some holes I guess and hopefully nothing too serious behind :roll: The passenger side wing is fine other than dents & dings at the front corner.

Image

And the drivers side rear arch and lower quarter area, pretty much the same as the passenger side that I have already started....

Image

Front suspension all stripped and laid out for cleaning & repainting. Why do the drum brakes have a spring round them ??

Image

As most of you guys already know, getting used to the unseen width of the car from the drivers seat is a problem. The offside front wing has got several scrapes, the most recent being caused by my lad hitting the petrol pump barriers and taking the paint off. Bumper was slightly twisted when we got it and is no worse for the bump so I'm not going to replace that. Started with a bit of filler and its now primed ready for paint...........

Image

As a consequence of all this corner damage the headlight trims had also taking a bashing and seen better days. For the moment we've decided to straighten them, reprofile with some filler (good old Isopon P38!) and they will be painted body colour. I think these trims are around $400 each so this will be fine for now and it fits with our theme to colour code or remove most of the chrome trims to the front and rear of the car for a more modern look..... Both trims had been flattened and needed a fair bit of tapping out to get their rough profile back and then here with filler applied to both trims as below...

Image

After a fair bit of sanding, filling and sanding and priming I finally painted them in Kawasaki Green for now to see how good they came out and was very pleased with the result. They will be Sublime Green in due course to match the car once we get the paint mixed up ready to paint all the little bits...

Image

Compared to how they started out, the difference is amazing for the sake of some filler and elbow grease...... OK, I know its not concours or correct but it will look a whole lot better for this summer until we save up for new trims.
This was the starting point

Image

Well that's about it for now. Work has continued on the bumpers and the rear end and I'll post some pics of that tonight..........
User avatar
mustangbooks
Posts: 676
Joined: Wed Sep 05, 12 11:51 am
Location: Feltham
Contact:

Post by mustangbooks »

raven68 wrote:Ok, first - how do you do the multiple quote answers ? I cant figure that out on here yet........ :?
Nothing fancy, I just copied & pasted the
... wrote: and
codes several times!
User avatar
Cannonball
Posts: 17242
Joined: Sun Apr 18, 04 11:26 pm
Location: crewe, cheshire
Contact:

Post by Cannonball »

i reckon you are rright re that car sitting outside, a mate of mine had a look at that when it was for sale within a couple of yrs imported in to this country he said the trunk was rusty then and that was about it and he is a fussy bugger, so what you are seeing is typical rot due to our terrible weather, its gone through this last 15 yrs what cars from the low 70,s did and look how they fell apart, i always gasp in amazement when jim wilson tells me he had either a 71 challenger sixpak or cuda 440 6 back in 76 as he daily driver he said it rotted to nothing and got scrapped soon after amazing stuff think what that bugger would be worth,

your doing well with that car i always felt it was lacking somewhere you need hop it up somehow ????
www.dwatts80.fsnet.co.uk

WATTS RACING TRANSMISSIONS, CLOBBER THE COMPETITION ITS CLOBBERIN TIME

OFTEN OUTNUMBERED NEVER OUTGUNNED,

HEY WHATS THE TOP END ON THAT SUPERSPORTS. UNLIMITED,

I HAVE A NVQW

LIFE GOES PRETTY FAST, IF YOU DONT LOOK ROUND A WHILE YOU MAY JUST MISS IT,

THE PASS IS THE JUICE,

LOVED BY FEW,
HATED BY MANY
RESPECTED BY ALL
User avatar
Carl
Posts: 4826
Joined: Mon Jul 30, 12 2:10 pm
Location: Rochford. Essex

Post by Carl »

Great stuff keep it coming.
Petty Roadrunner 416 Stroker 4 Speed
*MMA-609*
"Built to be driven!"

Why me??? :banghead:
User avatar
Steve
Posts: 7453
Joined: Wed Feb 01, 12 7:19 pm
Location: Scotland

Post by Steve »

What a great project and write up...love it!

Im also with you on the run it and fix it bit by bit ethos. Definately for using. Im doing the bodywork on my Fury panel by panel rather than gutting it because I know it will never go back together if it ends up in boxes :thumbright:
Bat Girl Stalker Living Petes Dream
V8 Sam

Post by V8 Sam »

im 99% sure I know this car.. and its previous owner.

its coming along well!


Image

This her?
User avatar
raven68
Posts: 261
Joined: Fri Jan 03, 14 10:18 am
Location: Bristol
Contact:

Post by raven68 »

V8 Sam wrote:im 99% sure I know this car.. and its previous owner.

its coming along well!
Like the pic ! Well there's only one Sublime Green Western Sport Special Challenger in the UK so I guess it must be ;)

Give my regards to young James and I hope he's making good progress with the Nova?
Last edited by raven68 on Mon Jan 20, 14 10:38 pm, edited 1 time in total.
User avatar
Steve
Posts: 7453
Joined: Wed Feb 01, 12 7:19 pm
Location: Scotland

Post by Steve »

Isnt there one in Bromsgrove??

:thumbright:
Bat Girl Stalker Living Petes Dream
Post Reply