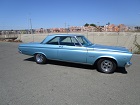
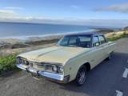
Steves 66 Sport FuryIII
Moderator: Moderators
-
death vali
- Posts: 101
- Joined: Tue Apr 02, 13 12:33 pm
- Location: wet n sunny wolverhampton

Thanks for all the suggestions men....cant afford new wheels so having to stick to the 14" steels. Been spending it on other bits to get her finished before upgrading what I have.
Terry, the dogdishes are staying in my box of bits for now as they fit my Winter wheels on the Polara.....nice try though mate
Work been a pain this week but managed to do a couple of bits of bodywork. Ive fixed the bottom corner of the drivers door which is now ready for paint and both sections where the roof meets the rear fender. Think water was getting in behind the chrome trim and rusted the join a bit where the mounting bolts go through. Nothing requiring welding, just rubbed down, Kurusted, filled with liquid weld then sanded and primed.
Nearly done with the little bits and mentally prepping myself to tackle the trunk.
thanks again for the support and kind words gents
cheers Steve
- Attachments
-
- 20140303_171223.jpg (123.53 KiB) Viewed 1081 times
-
- 20140306_113023.jpg (130.96 KiB) Viewed 1081 times
-
- 20140306_113008.jpg (128.91 KiB) Viewed 1081 times
-
- 20140306_110726.jpg (134.72 KiB) Viewed 1081 times
Bat Girl Stalker Living Petes Dream
-
autofetish
- Posts: 5599
- Joined: Sat May 21, 11 6:43 am
Very good work
What's this boot floor like ?
Photo bucket Steve photo bucket !!!
http://www.moparuk.com/forums/viewtopic.php?t=38315
What's this boot floor like ?
Photo bucket Steve photo bucket !!!
http://www.moparuk.com/forums/viewtopic.php?t=38315
The closer you are to death the more alive you are
Yeah Will...I need to get to grips with that photo bucket thingy 
the section on the passenger side photo looks a bit lumpy at the bottom of the chrome window trim. It just needs to be taken down flush but the weather beat me so I just threw some primer on to seal it up.
The trunk is a bigger job....numerous holes etc that I found after I scraped the original trunk mat off. My plan is to remove the tank and bumper, cut the entire floor out including the right angled sections that drop down to the lower edge of the fender, then make up the new panels and weld in. The end sections are straight forward and will be attached to the main floor using a small 90 deg lip and the main floor will be made of two sections that will have a joggled edge in the middle that I will weld up. I will see what the supports are like when I take everything out and renew if needed.
my biggest problem is rolling beads into the replacement panels as I want to make it strong and look as original as possible when done. Heat and bolster chisel is one option but a guy who passed my house and got chatting, is making me something to do it (hopefully). Hes a retired engineer who is into steam engines so has the knowledge....a big project but really looking forward to getting stuck in!! Time and the weather are beating me at the mo...
cheers Steve
Bat Girl Stalker Living Petes Dream
Yeah Will...I need to get to grips with that photo bucket thingy
the section on the passenger side photo looks a bit lumpy at the bottom of the chrome window trim. It just needs to be taken down flush but the weather beat me so I just threw some primer on to seal it up.
The trunk is a bigger job....numerous holes etc that I found after I scraped the original trunk mat off. My plan is to remove the tank and bumper, cut the entire floor out including the right angled sections that drop down to the lower edge of the fender, then make up the new panels and weld in. The end sections are straight forward and will be attached to the main floor using a small 90 deg lip and the main floor will be made of two sections that will have a joggled edge in the middle that I will weld up. I will see what the supports are like when I take everything out and renew if needed.
my biggest problem is rolling beads into the replacement panels as I want to make it strong and look as original as possible when done. Heat and bolster chisel is one option but a guy who passed my house and got chatting, is making me something to do it (hopefully). Hes a retired engineer who is into steam engines so has the knowledge....a big project but really looking forward to getting stuck in!! Time and the weather are beating me at the mo...
cheers Steve
Bat Girl Stalker Living Petes Dream
Quick update....work hampering stuff at mo but bit of progress....
mirrors on....look fine and £30 cant be bad!
Most of the little bits of bodywork done, started stripping stuff out to tackle the trunk floor. Hope to drop the tank out over weekend.
Rear bumper off, bit of surface rust on back so rust treated and will paint to stop any further rusting.
Licence plate light cleaned, painted and now operating (bad earth)
Horn now working....fault in button so had to make a plate with three small contact bolts on it that sit on the rubber posts on the column and now operates. Painted horns while I was at it.
indicator conversion nearly done....wiring done but got usual earthing issues so will put earth leads on all the bulb holders over the weekend. Think the flasher relay is playing up as well so will look at that.
New washer bottle in and working. Another bad earth on the pump, now sorted.
Hood insulation pad installed.
Outside window cats whiskers fitted. Inners bit more awkward as they are stapled to the door card. Will think of a better way of fixing.
Noticed bit of corrosion in the fuse box yesterday so must hit that soon.
chuffed with the quality of the window strips from Steele Rubber Products and cant recommend Ron Fenton enough....definately the way to bring a bunch of parts in for minimal hassle and cost. Wont hesitate to use again....thanks Ron
cheers Steve
- Attachments
-
- 20140312_155143.jpg (151.22 KiB) Viewed 1031 times
-
- 20140314_112638.jpg (191.81 KiB) Viewed 1031 times
-
- 20140319_101057.jpg (94.69 KiB) Viewed 1031 times
-
- 20140319_110555.jpg (183.47 KiB) Viewed 1031 times
Bat Girl Stalker Living Petes Dream
Few more...wiring pic shows everything cleaned up and properly earthed with small leads running to new earth point on bulkhead. Bulkhead connector cleaned thoroughly and packed with dielectric grease.
- Attachments
-
- 20140313_170625.jpg (163 KiB) Viewed 1027 times
-
- 20140309_171223.jpg (181.63 KiB) Viewed 1027 times
-
- 20140314_112334.jpg (154.87 KiB) Viewed 1027 times
-
- 20140314_170925.jpg (199.05 KiB) Viewed 1027 times
Bat Girl Stalker Living Petes Dream
-
autofetish
- Posts: 5599
- Joined: Sat May 21, 11 6:43 am
Thanks Will...chipping away at it 
Finished up the basic indicator conversion today. Just need to swap my flasher relay and hopefully they will flash and I can tape the loom up in the trunk.
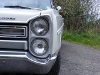
Picked up a set of tailights and shipped them over on Rons container. Just needed the lenses but surrounds better than mine. They are Fury II so painted with chrome accent lines but nicer I think than my worn all chrome ones. Went a bit cold out so I gave them the once over. Repainted the silver area, re did the satin black lines and just need to work out a way to get the paint off the ridges without damaging the new paint. Tried thinner on a cloth wrapped on a block of wood but it damaged the silver. Probably just gently drag a stanley blade over them. One in with new gaskets, other one tomorrow.
finally, got brake lights working. The switch wasnt resting on the pedal properly so removed the bracket and extended it about 1/4". Back in and working fine.
Cheers Steve
Finished up the basic indicator conversion today. Just need to swap my flasher relay and hopefully they will flash and I can tape the loom up in the trunk.
Picked up a set of tailights and shipped them over on Rons container. Just needed the lenses but surrounds better than mine. They are Fury II so painted with chrome accent lines but nicer I think than my worn all chrome ones. Went a bit cold out so I gave them the once over. Repainted the silver area, re did the satin black lines and just need to work out a way to get the paint off the ridges without damaging the new paint. Tried thinner on a cloth wrapped on a block of wood but it damaged the silver. Probably just gently drag a stanley blade over them. One in with new gaskets, other one tomorrow.
finally, got brake lights working. The switch wasnt resting on the pedal properly so removed the bracket and extended it about 1/4". Back in and working fine.
Cheers Steve
- Attachments
-
- 20140322_172019.jpg (170.96 KiB) Viewed 988 times
-
- 20140322_180751.jpg (140.85 KiB) Viewed 988 times
-
- 20140322_150814.jpg (147.28 KiB) Viewed 988 times
-
- 20140322_141924.jpg (163.81 KiB) Viewed 988 times
Bat Girl Stalker Living Petes Dream
-
Cannonball

- Posts: 17242
- Joined: Sun Apr 18, 04 11:26 pm
- Location: crewe, cheshire
- Contact:
brill steve
gonna drop you a challenger off to play with when your done with that,
gonna drop you a challenger off to play with when your done with that,
www.dwatts80.fsnet.co.uk
WATTS RACING TRANSMISSIONS, CLOBBER THE COMPETITION ITS CLOBBERIN TIME
OFTEN OUTNUMBERED NEVER OUTGUNNED,
HEY WHATS THE TOP END ON THAT SUPERSPORTS. UNLIMITED,
I HAVE A NVQW
LIFE GOES PRETTY FAST, IF YOU DONT LOOK ROUND A WHILE YOU MAY JUST MISS IT,
THE PASS IS THE JUICE,
LOVED BY FEW,
HATED BY MANY
RESPECTED BY ALL