Possible earth problem?

Moderator: Moderators

User avatar
Dave-R
Posts: 24752
Joined: Sun Apr 18, 04 11:23 pm
Location: Dave Robson lives in Geordieland
Contact:

Post by Dave-R »

Sorry it was late. ;)
Charger wrote:how about oil and temp gauge, do they behave the same?? only work with lights on

if so I would suggest your voltage reg is getting it’s 12v from the lighting circuit instead of ignition switched 12v
That's a very strong and logical possibility.

A hand help volt meter is your best tool to trace voltage and earth problems. It's impossible to guess these things and trial and error can send you around in circles.

You switch on, has it got volts at the input? - if no check why not. If yes check between input and output. If no. it's not working. If yes check between output and good ground somewhere. If voltage present you haven't got a ground from the output.

This is how you check any electrical circuit.
User avatar
Charger
Posts: 5235
Joined: Mon Dec 12, 05 11:40 am
Location: Manchester, UK MMA/921

Post by Charger »

you may need to pull the cluster to test it

this is how I did mine …

Image

Image

I soldered the wires from the CPT voltage reg into the original connectors on the board where the OEM voltage reg used to go

red = 12+ve supply from ignition switched circuit
yellow = 5+ve from CPT voltage reg
2x black = -ve earth

looking at the back of the cluster, at the 5 connector pins, you need to check you're getting 12+ve at pin no.4 (going left to right), trace the board down to the OEM voltage reg port and you will see this is where my red wire is connected

using a 12+ve source you can test everything on the bench before you put it back in …

Image
Si
1970 Charger 500
383 | 4bbl | 727 column | PAS | PAB | buckets/buddy - check out my photos HERE

If you don't want another same old brand-new car ... you could be DODGE MATERIAL

1970 Dodge Charger Registry - https://www.1970chargerregistry.com/
User avatar
Rebel
Posts: 2978
Joined: Sat Jul 23, 05 11:58 am
Location: Filthy McNastys Pleasure Emporium

Post by Rebel »

Brilliant, thanks for the replies, I'll get onto taking the cluster out and having a look at it again :thumbright:
'68 Dodge Charger
‘75 Ford Ranchero
'93 Toyota Hilux Surf

YouTube - Double Zero Garage
User avatar
Rebel
Posts: 2978
Joined: Sat Jul 23, 05 11:58 am
Location: Filthy McNastys Pleasure Emporium

Post by Rebel »

Removed the dash cluster, then the pcb, as can be seen in the pic, there's some crud around the base of the 5 pins where the power supply plugs in. Some of the exposed copper has also become discoloured.
Would it be ok to clean the crud off with lighter fluid on a cotton bud or is there a better solution to cleaning / removing the crud?

What's the best way to remove the discolouring from the exposed copper?

I was thinking of a light rubbing with something like 1200 grade sandpaper so as not to rub through the copper
Attachments
image.jpg
image.jpg (218.33 KiB) Viewed 604 times
'68 Dodge Charger
‘75 Ford Ranchero
'93 Toyota Hilux Surf

YouTube - Double Zero Garage
User avatar
Charger
Posts: 5235
Joined: Mon Dec 12, 05 11:40 am
Location: Manchester, UK MMA/921

Post by Charger »

looks like somebody’s had trouble with that before

the pins aren’t normally soldered

check you’ve got continuity between each pin and it’s respective track on the board

and that you haven’t got any continuity between the tracks

:thumbright:
Si
1970 Charger 500
383 | 4bbl | 727 column | PAS | PAB | buckets/buddy - check out my photos HERE

If you don't want another same old brand-new car ... you could be DODGE MATERIAL

1970 Dodge Charger Registry - https://www.1970chargerregistry.com/
User avatar
Dave999
Posts: 9563
Joined: Thu Feb 24, 05 10:31 am
Location: Twickenham,London, England

Post by Dave999 »

melt the solder at each junction and test again. the gunge is probably flux from resin/flux cored solder used previoulsy it will look like brown wax it chemically burnishes the joint as it melts and gets all over if you use big fat powder cored solder

if all good job done

or do it properly

desolder use solder sucker or desoldering braid
pull through
be careful not to pull the track off the board

use plumbers flux or soldering flux powder on the copper and the pins, heat it and it flows and cleans. (or just give it all a clean up and use flux cored solder)
give the mess a mop up but don't touch the track with greasy finger once it has been fluxed it kinda acid etches the surface for a good solder flow

tin both with solder
assemble

light touch at the junction with the iron to flow the previously applied solder down the pin and into the hole and across the track
make sure you don't link anything with a solder bridge that should not be linked
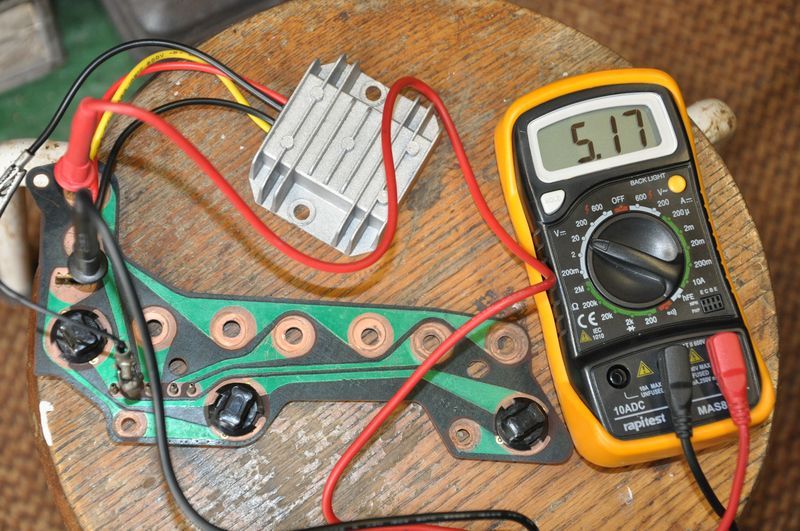
test it again.
the best joint is mechanical joint pin pressing on copper that is glued in place with solder.

when the high end hi fi guys build an amp they make connections by twisting their components onto tag boards
the amp would work without the solder. its put on as a permenant way to make sure the physical connection stays put. that way the conductivity/resistance of solder doesn't become part of the amp circuit. only the component's rated conductivity is included

if that method is good enough for them its very very good, possibly to the point of overkill here. :)


dave
The Greater Knapweed near the Mugwort by the Buckthorn tree is dying
User avatar
Rebel
Posts: 2978
Joined: Sat Jul 23, 05 11:58 am
Location: Filthy McNastys Pleasure Emporium

Post by Rebel »

Thanks guys,

I'll check everything and try cleaning as much as I can before trying to remove the old solder and replace with new
'68 Dodge Charger
‘75 Ford Ranchero
'93 Toyota Hilux Surf

YouTube - Double Zero Garage
User avatar
Rebel
Posts: 2978
Joined: Sat Jul 23, 05 11:58 am
Location: Filthy McNastys Pleasure Emporium

Post by Rebel »

Checked all tracks on the circuit board, cleaned all the crud off the board and gave the copper a light sanding. Checked the continuity along the full length of all the tracks in relation to the pins. All seems good and there is continuity in all areas that there should be now.

At least it looks as though it's working while on the bench, I'll get it back in the car tomorrow and see if all the issues are resolved.
'68 Dodge Charger
‘75 Ford Ranchero
'93 Toyota Hilux Surf

YouTube - Double Zero Garage
User avatar
Rebel
Posts: 2978
Joined: Sat Jul 23, 05 11:58 am
Location: Filthy McNastys Pleasure Emporium

Post by Rebel »

Fitted the cluster back in the car and all working well, the dirty and corroded circuit board must have been at fault as well as the voltage regulator dying, before I removed it the fuel gauge was showing half full and the oil pressure gauge had stopped working. After putting it all back together the oil pressure gauge started working and the fuel gauge was reading almost empty.
After putting some petrol in, the gauge started to move so everything is working properly again.
Also changed all the dashboard bulbs for L.E.D's, that dash now has a pleasing to the eye white glow :thumbright:
'68 Dodge Charger
‘75 Ford Ranchero
'93 Toyota Hilux Surf

YouTube - Double Zero Garage
Mossy68
Posts: 7679
Joined: Wed Jun 27, 12 6:57 pm
Location: Ongar Essex

Post by Mossy68 »

Good to hear. Well done :thumbright:
It's all about Smiles per gallon !!!
68 Coronet sedan 500 4 door
Dodge Ram SRT 10
MMA-013
Post Reply