Steves 66 Sport FuryIII
Moderator: Moderators


-
pete walton

- Posts: 1402
- Joined: Mon Jan 16, 12 4:18 pm
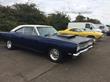
Nice work Steve ,wish i had your skills ,shame they do not build cars out of bricks ,,,i could save my self a fortune ,,,and heres one they made earlier 
- Attachments
-
- mopp_0905_02_z+1966_plymouth_fury_iii+rearview.jpg (65.66 KiB) Viewed 984 times
Jesus saves but satan does that thing with his tongue you like
Pete's picture is exactly what I'd be doing to the Fury Steve.......Your car my choice! 

Dave Tildesley.....MMA-081
72 Dodge Dart
73 Plymouth Duster - SOLD
I wanna go so FAST i think i'm going to DIE!..........Then i'll shift into second!
"My Car is a work in progress, Probably never gonna get finished, never gonna have the money to Bananarama!!"
72 Dodge Dart
73 Plymouth Duster - SOLD
I wanna go so FAST i think i'm going to DIE!..........Then i'll shift into second!
"My Car is a work in progress, Probably never gonna get finished, never gonna have the money to Bananarama!!"
That is a great looking car men...thanks for the pic! I need to master the skills around just getting her MOTd etc before I even consider trying to learn how to do that!! Very nice though and food for thought....
Right... the learning curve got really steep this morning. Tried, unsuccessfully, to weld in the patch panel I made up. Nightmare to be honest and was a mistake, at my level, to try to weld in along the bead line. Turned the floor into a culinder along that edge
Back to the drawing board and decided to cut a bigger section out with flat edges. Bigger repair but much easier for me to tackle. Made up a replacement panel and welded it in before work this afternoon. Certainly not very neat or pretty but solid and should tidy up ok with the sanding disc tomorrow. It is perfectly flush at the weld...the black isnt gaps its like a sooty deposit. The welds had little flames on them that sooted up. Not sure what that is as I cleaned all the edges up before welding??? Should clean up though...God bless angle grinders!!
Cheers Steve
- Attachments
-
- floor pan 4.JPG (219.3 KiB) Viewed 928 times
-
- floor pan 3.JPG (239.82 KiB) Viewed 928 times
-
- floor pan 2.JPG (203.47 KiB) Viewed 928 times
-
- floor pan 1.JPG (181.22 KiB) Viewed 928 times
Bat Girl Stalker Living Petes Dream
....welds in floorpan smoothed out today and drilled for parking brake cable bracket. Primed and undersealed. Will fit bracket tomorrow.
Had a break from grinding etc and gave the rear brake drum the once over. Cleaned the shoes, cylinders etrc as well.
Cut out the drivers side lower rear quarter panel ready to make up new one tomorrow if the weather is ok....
Cheers Steve
Had a break from grinding etc and gave the rear brake drum the once over. Cleaned the shoes, cylinders etrc as well.
Cut out the drivers side lower rear quarter panel ready to make up new one tomorrow if the weather is ok....
Cheers Steve
- Attachments
-
- parking brake bracket 2.JPG (193.56 KiB) Viewed 895 times
-
- rear brake drum painted.JPG (220.85 KiB) Viewed 895 times
-
- floor pan 10.JPG (146.05 KiB) Viewed 895 times
-
- floor pan 9.JPG (202.78 KiB) Viewed 895 times
Bat Girl Stalker Living Petes Dream
Had quite a productive end to the week today before the rain set in...
Made up a drivers side quarter patch panel as the original repair area was showing signs of rot....
Made same as the pass side but wasnt able to save the rear lip unfortunately so the panel incorporates it. Fits ok but I havent got the lower rear radius quite right so will have to fettle it. Next job is to weld up the sections on the lip with a thin plate behind it then grind it smooth before fitting. It looks messy but its the only way I could think of to put the lip in and still be able the curve the panel to match the body line. Should be ok when its welded up in next few days. Off Thursday so hoping to get it fitted then...I paid more attention to getting the lines straight this time and the fit is better.
Cheers Steve
- Attachments
-
- drivers quarter patch panel 4.JPG (217.63 KiB) Viewed 852 times
-
- drivers quarter patch panel 3.JPG (210.32 KiB) Viewed 852 times
-
- drivers quarter patch panel 2.JPG (186.32 KiB) Viewed 852 times
-
- drivers quarter patch 1.JPG (194.11 KiB) Viewed 852 times
Bat Girl Stalker Living Petes Dream
few more pics...
- Attachments
-
- drivers quarter patch panel 8.JPG (172.75 KiB) Viewed 846 times
-
- drivers quarter patch panel 7.JPG (212.23 KiB) Viewed 846 times
-
- drivers quarter patch panel 6.JPG (191.67 KiB) Viewed 846 times
-
- drivers quarter patch panel 5.JPG (191.03 KiB) Viewed 846 times
Bat Girl Stalker Living Petes Dream
Contour of the rear arch looks really good in the last pic Steve.
Great to see you getting stuck in.......If your not careful you'll finish this and have to get another Mopar to fix up!
Great to see you getting stuck in.......If your not careful you'll finish this and have to get another Mopar to fix up!
Dave Tildesley.....MMA-081
72 Dodge Dart
73 Plymouth Duster - SOLD
I wanna go so FAST i think i'm going to DIE!..........Then i'll shift into second!
"My Car is a work in progress, Probably never gonna get finished, never gonna have the money to Bananarama!!"
72 Dodge Dart
73 Plymouth Duster - SOLD
I wanna go so FAST i think i'm going to DIE!..........Then i'll shift into second!
"My Car is a work in progress, Probably never gonna get finished, never gonna have the money to Bananarama!!"